Adding New Contacts: If you’re setting up your Aplos account and already have a list or file of your contacts and their information, you can use the import tool to upload and easily add those contacts all at once.
Updating Contacts: If you are looking to update existing contacts in your import, you can also do this using the import tool. To accomplish this you can export the Contact List and it will include a column for Contact ID. When you import your new file, if you include the Contact ID, the system will find and update this existing record.
Below is a video tutorial, as well as written steps, that go over the process involved with accomplishing these tasks:
Step 1: Preparing Your File
You will need your contacts and their information in an .xlsx file in order to upload. You can use any file, but we recommend formatting your file with a header row across the top with one column for each contact data field like the example below:

Importing a List of Contacts
You can import contacts into a List that you’ve created by adding a separate column for each List and using a ‘y’ or ‘n’ value to indicate whether or not each contact should or shouldn’t be included in that group.
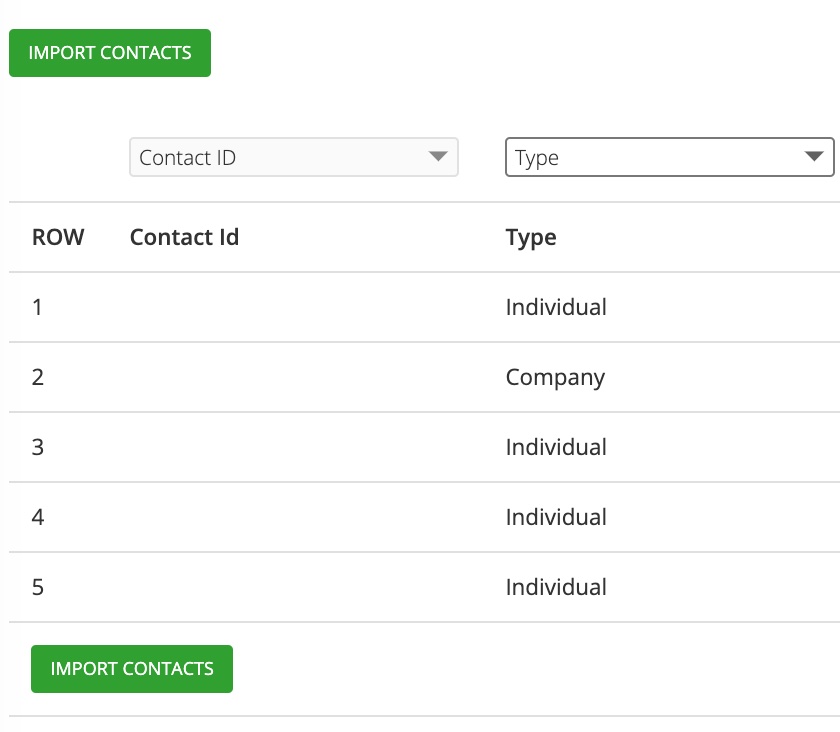
Updating Existing Contacts Using Contact ID
You will populate the Contact ID column ONLY when you are updating an existing contact. This field is not meant to assign a contact ID to a contact you’re importing. If you enter a number in the Contact Id field for a new contact, this could throw an error during the import process. You can get the Contact Id for any of your existing contacts by exporting your Contact List.
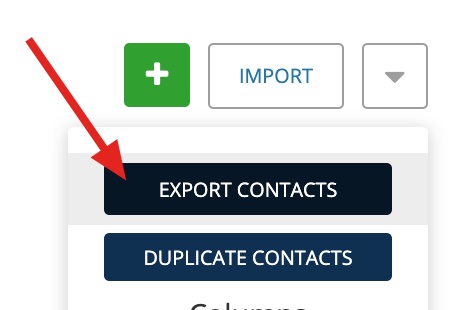
How to Export Your Contact List
If you’re looking to export your Contact List, you can accomplish this from your Contact List page. Click on the drop down arrow in the top right corner of your page, then click Export Contacts. This will export the contacts with their Contact ID needed to update the record.
Step 2: Uploading Your File
Once your file is formatted and ready for importing, you’ll want to click your People tab on the top navigation, then Contact List. From there, click on the Import button in the upper right-hand side of the page. This will take you to your import page where you will click the “Choose File” button to locate and choose the correct file:
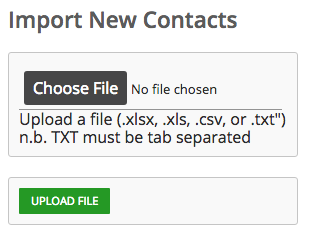
Once your file is selected, click the Upload File button.
This will reload your page and show you a preview of your contact file. Your import is still pending at this point and is not yet complete. If you see any errors and would like to re-import your file, you can use the “Re-Import Contacts” button to cancel the import in progress and return to the previous screen to select and upload a new file. Otherwise, you can move on to assigning each column to the correct contact field. We call this “mapping” your file.
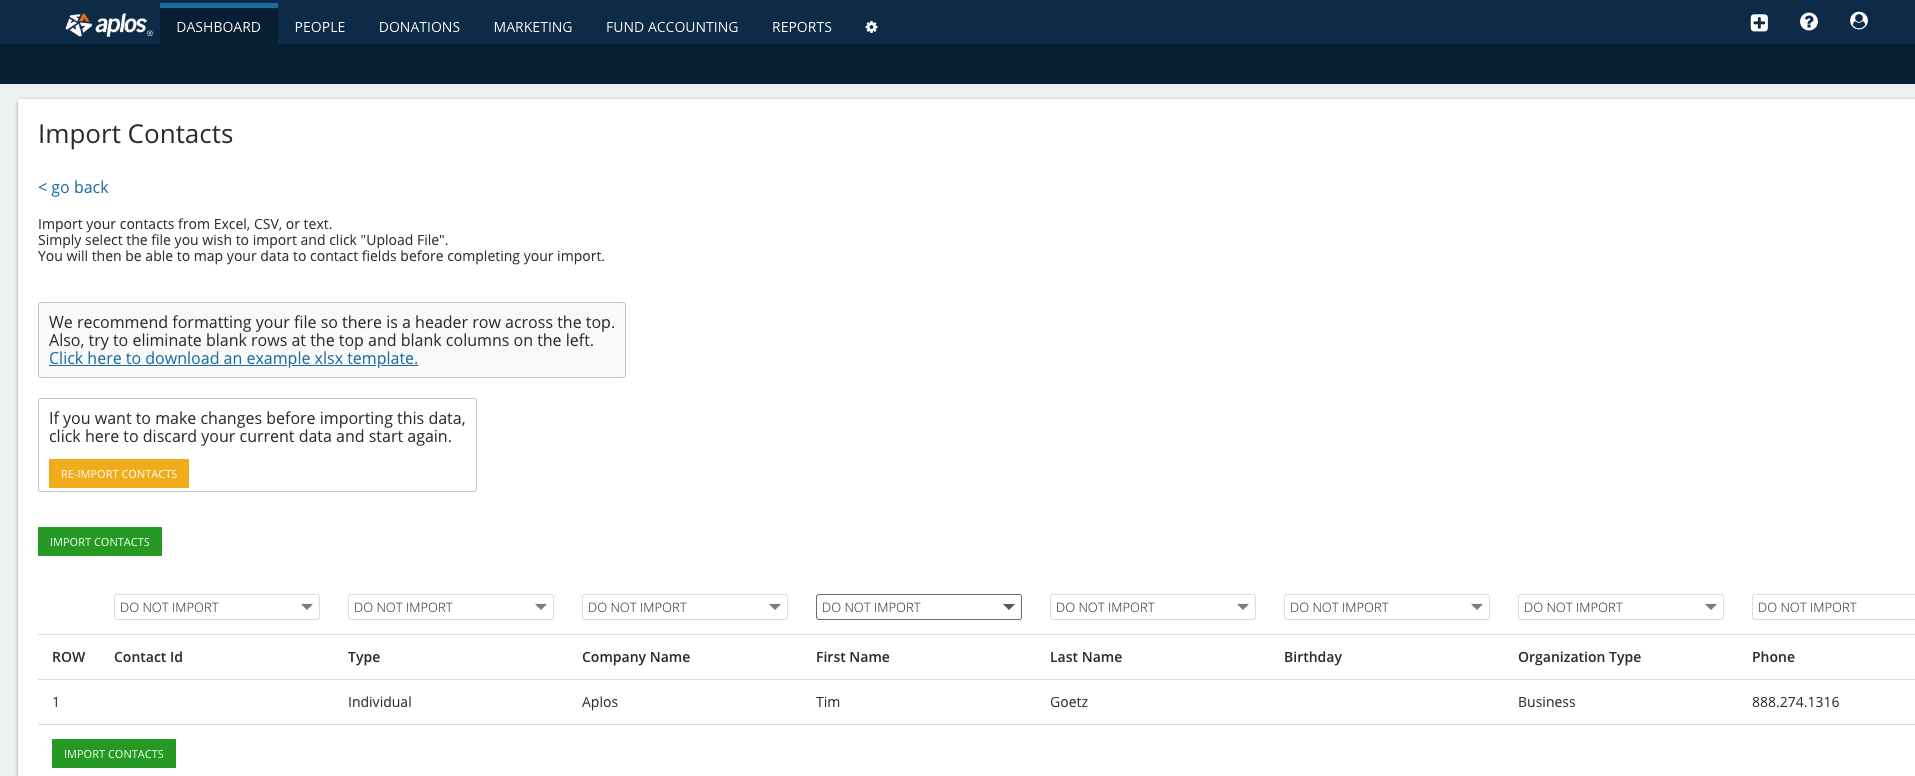
Step 3: Mapping Your File and Completing the Import
Above each column, you’ll see a drop down menu that is set to “DO NOT IMPORT” by default. You will need to click on the drop down and select the appropriate contact field that corresponds with each column.
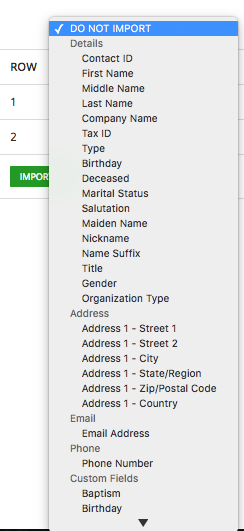
When importing email addresses, you will see the Email Address option listed once. You will select this option from the drop down for every email column you have. The type of email that you have should be designated by the header on your import file. So, for example, if you have a home email and a business email, you will need to have two columns on your spreadsheet. When importing multiple email addresses, the email on the left-most column will import as the Primary email address. Below are header examples for your import file and what email type will be assigned upon import:
- Header contains “home”
- Home
- Header contains “work”, “office”, “business”
- Work
- Otherwise…
- Other
When importing phone numbers, you will follow a similar type of logic. For any phone number, you’ll choose the Phone Number option from the drop down. When importing multiple phone numbers, the phone number on the left-most column will import as the Primary phone number. Below are header examples for your import file and what phone type will be assigned upon import:
- Header contains “home”
- Home
- Header contains “mobile”, “cell”, “iphone”
- Mobile
- Header contains “fax”
- Fax
- Header contains “work”, “office”, “business”
- Work
- Otherwise…
- Other
When importing addresses, for your first address, you will choose the appropriate options from the drop down for Address 1. For any additional addresses, you’ll choose options for Address 2, Address 3, etc. When importing multiple addresses, the address on the left-most column will import as the Primary address. Below are header examples for your import file and what address type will be assigned upon import:
- Header contains “home”
- Home
- Header contains “work”, “office”, “business”
- Work
- Otherwise…
- Other
If there are any columns you do not wish to include in the import, you can leave the “DO NOT IMPORT” option selected. This might be selected for columns from your file that are not necessary or perhaps have no data to import.
Once all columns are mapped out, click the “Import Contacts” button to finalize the import. Clicking this will return you to your main Contacts page where you’ll see the contacts from your file included.
Contact Import Errors
A common error that you might receive will be due to unaccepted characters in the email address field. The import process does not allow you to import multiple email addresses in a single column, so if you have two email addresses listed, and error message will appear. You’ll need to edit your import file and re-import the file.
You may also receive an error if you attempt to import a value into a field that has a different format. For example, if you attempt to import text into a date field, you will receive an error.
Merging Duplicates
The importer does not flag or recognize duplicate contacts in your file, so you may find that you have imported contacts that already exist in your Contact List in Aplos. If you happen to find duplicates, you can check out this article on how to merge them together.