With Aplos you can easily record and track donations by donor. Whether adding individual contributions, or adding batch deposits, Aplos makes this process simple. Landing on your Contributions page will give you the option to record an individual donation, or a batch deposit. Either process will attribute the donation to your donor, and will allow you to track these in Accounting.
Recording a Contribution
You can record a single donation from the Contributions tab by clicking the green + button in the top right corner of your page. This will open the form where you will record the details of the donation. An asterisk will indicate required fields, so be sure to complete each required field to save. As you enter contributions, you will see them generate in your Contributions list. This page can be sorted by clicking on column headers if needed.
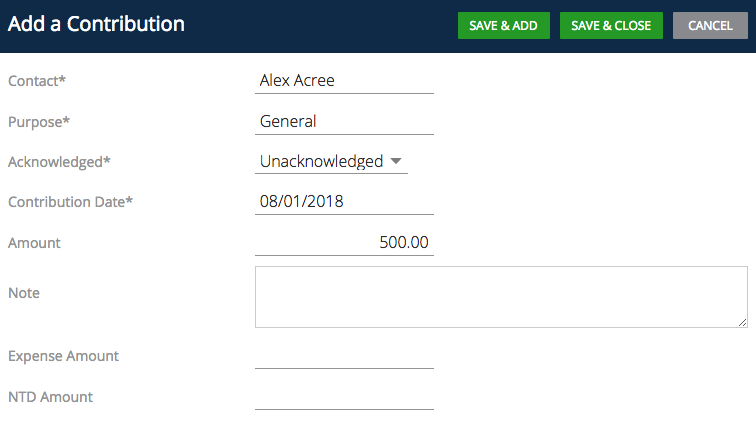
Once you complete the Contribution form, you can click Save & Close to return to the Contributions page, or click Save & Add to add a new contribution.
Here are some of the fields you have available on the form:
Acknowledged Donations
This field will trigger your follow up if you choose Unacknowledged. This means that you have not yet followed up with your donor to thank them for their donation. Thanking your donors is a beneficial step in building your relationship with your donors. Choosing the options of Acknowledged or Ignore will not provide any follow up action.
Donation Expense Amount
You will utilize this field if you are recording an online donation. Online donations include a processing fee from your merchant, which you can record as an expense. Enter the full amount of the donor’s donation before fees are removed in the Amount field, then record the transaction fee in the Expense Amount field. When depositing this donation, the amount reflected in your accounting will be the net amount of the donation.
NTD Amount for Non-Tax Deductible Portion
This field is available if any portion of the overall donation amount is non-tax deductible (NTD). You may need to use this if a portion of a payment was the purchase of a good, or service. You will enter the full amount of the payment in the Amount field, and the portion that is non-tax deductible in the NTD Amount field. When depositing this donation, the amount reflected in your accounting will be the full amount of check. The contribution statement will also show both the tax-deductible and non-deductible amounts.
As an example, if someone attended a fundraiser and wrote a check for $200, which was $25 for the cost of the ticket to attend the event, and the remaining $175 was a donation. You would record that in the Donations area as follows:

You can also record this type of donation as part of a Batch Deposit as well. In the Deposit page, you will want to click on “Create Deposit,” which will open a new form where you can enter the details of your donation. You will want to make sure to enter the NTD Amount, as well as check the NTD box;

Soft Credit Contact
Soft Credits in Aplos let you assign credit for a donation to someone who is not the direct donor but might have influenced that donation. For example, you might receive a donation from a foundation or a company, but the donation was actually made possible by someone else. This is where you can use a soft credit. A soft credit will let you credit another contact so they can be thanked or listed as a donor, but they do not receive a contribution statement. When running the Donations by Contact report you can select to show soft credits as an available column.
To use the “Soft Credit Contact” box on the Contribution or Batch Deposit form, simply enter the name of the contact who will be given a soft credit.
Deposits
You will see on the Contribution screen if a contribution is included in a deposit. The deposit process will track the donations in your Accounting. A deposit can be created from the Contributions Screen, Deposit screen as a batch deposit, or from the Account Register in the Accounting area of the software.
How to Deposit Contributions
You will see on the Contribution screen if the contribution is included in a deposit. This process will track the donations in your Accounting. Any un-deposited contributions will display a check-box. You can check the box for any contributions that you need to include in a batch, and click Create Deposit.
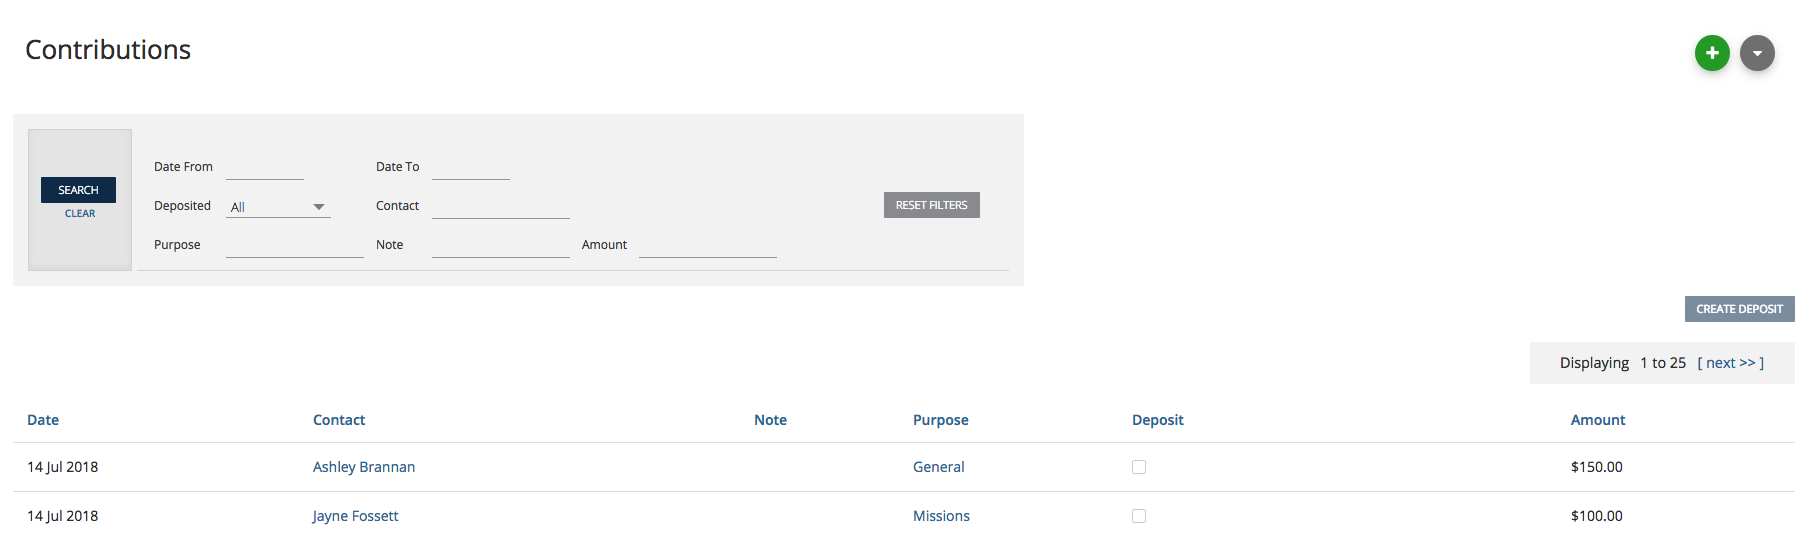
After clicking Create Deposit, the Contributions Deposit form will open, where you will select the date of your deposit, add a batch name, and description, and choose the bank account which this deposit should reflect in.
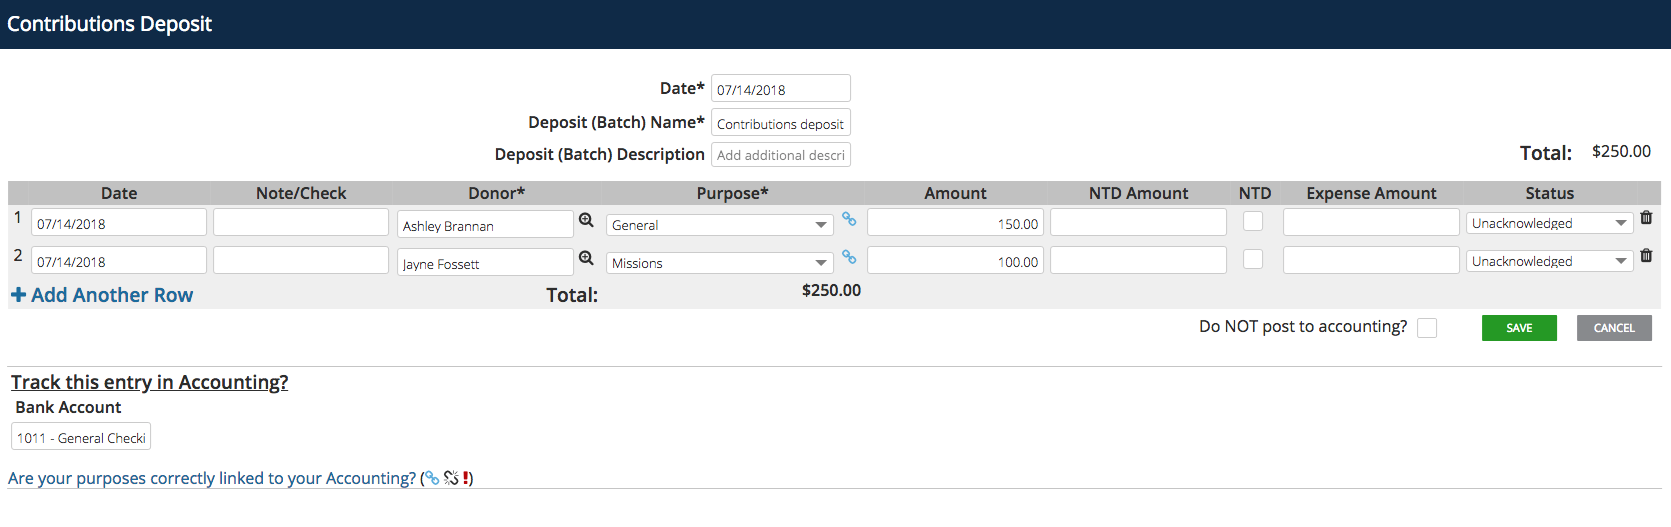
Once you click Save, your batch will show as a deposit in the selected bank account. You can edit any Deposit from the Deposits page by clicking the edit link on the far right of the deposit.
What is a Deposit Batch Name
The batch name is a reference title for the contributions entry. It’s typically used by organizations entering multiple donations from a single date/event at once. Some organizations may have an event at which they received many donations or they might record donations that were all deposited on the same day. It is a required field, but it’s just for your reference, so you can use this however you’d like to categorize the donations you’re entering.
Creating a Batch Deposit
If you have donations that you plan to deposit together, or have already deposited at your bank, you can record multiple donations on the Deposit page at one time instead of entering them individually on the Contribution screen. Click the Deposits tab, then Create Deposit. This will open your deposit form where you will record the details of each donation, choose a batch date, name, and description, then choose your bank account, and click Save.
Once you click Save, your donations will reflect as a deposit in the bank account chosen. You can edit any Deposit from the Deposits page by clicking the edit link on the far right of the deposit.
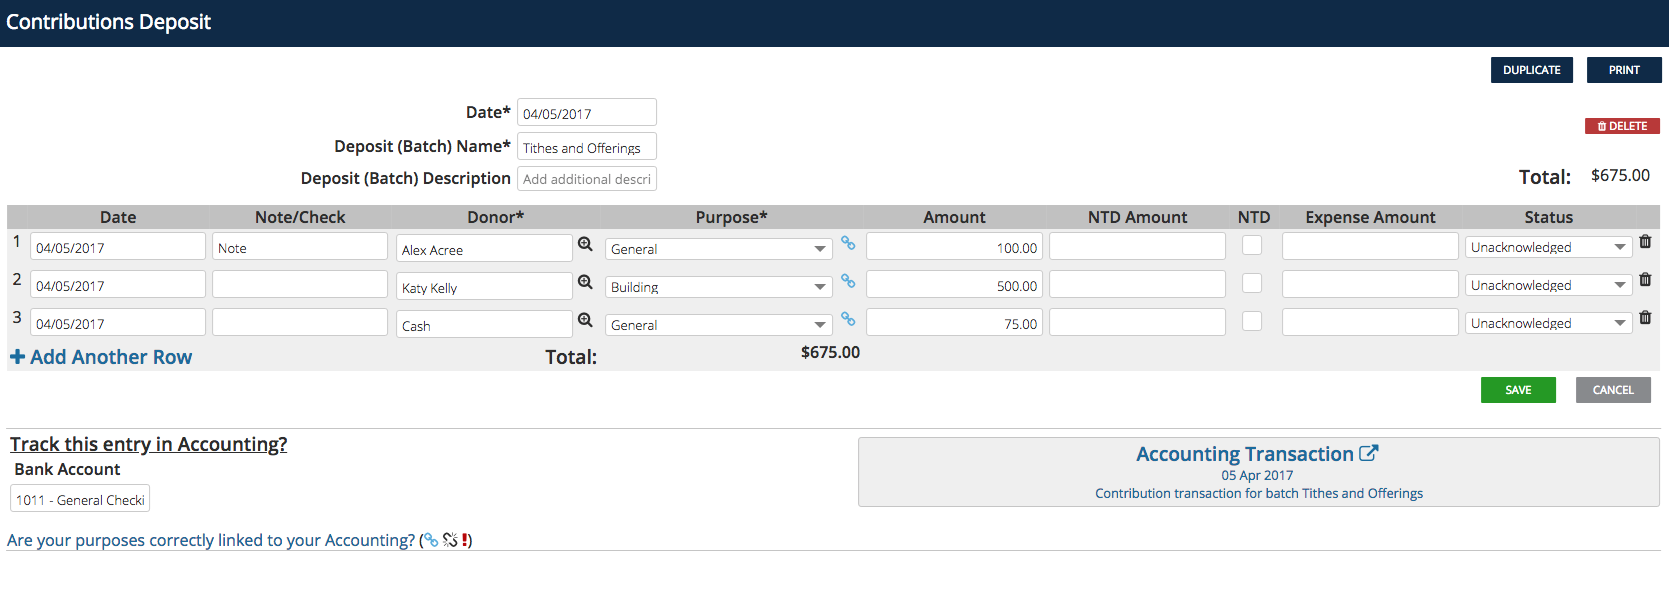
Create a Deposit Slip
You can click “Print” at the top right of the Deposit screen to print a PDF version of your deposit entry to keep for your records. Once you click Save, your donations will reflect as a deposit in the bank account chosen. You can edit any Deposit from the Deposits page by clicking the edit link on the far right of the deposit.
Deposit Batch: Do Not Post To Accounting
There will be situations when someone will want to generate a donation statement, but not create an accounting transaction for a donation. There is an option to select “Do not post to accounting” on the Batch Deposit form.

This is most commonly used when responsibilities for managing donations fall onto the shoulders of one person, but the accounting responsibilities fall onto the shoulders of someone else. Another case would be if you prefer to use transaction imports to post deposits from their bank for easier entry to avoid creating a duplicate transaction on accident. Another example would be a non-cash donation that does not affect your accounting.
Importing Donations
If you have donations exported from a previous or separate platform you can import those into Aplos. Click the Import button from your Contributions page. On this page, you will find a link to download a sample Aplos contributions file. You will need to download this file and follow the key to format your donations before importing.
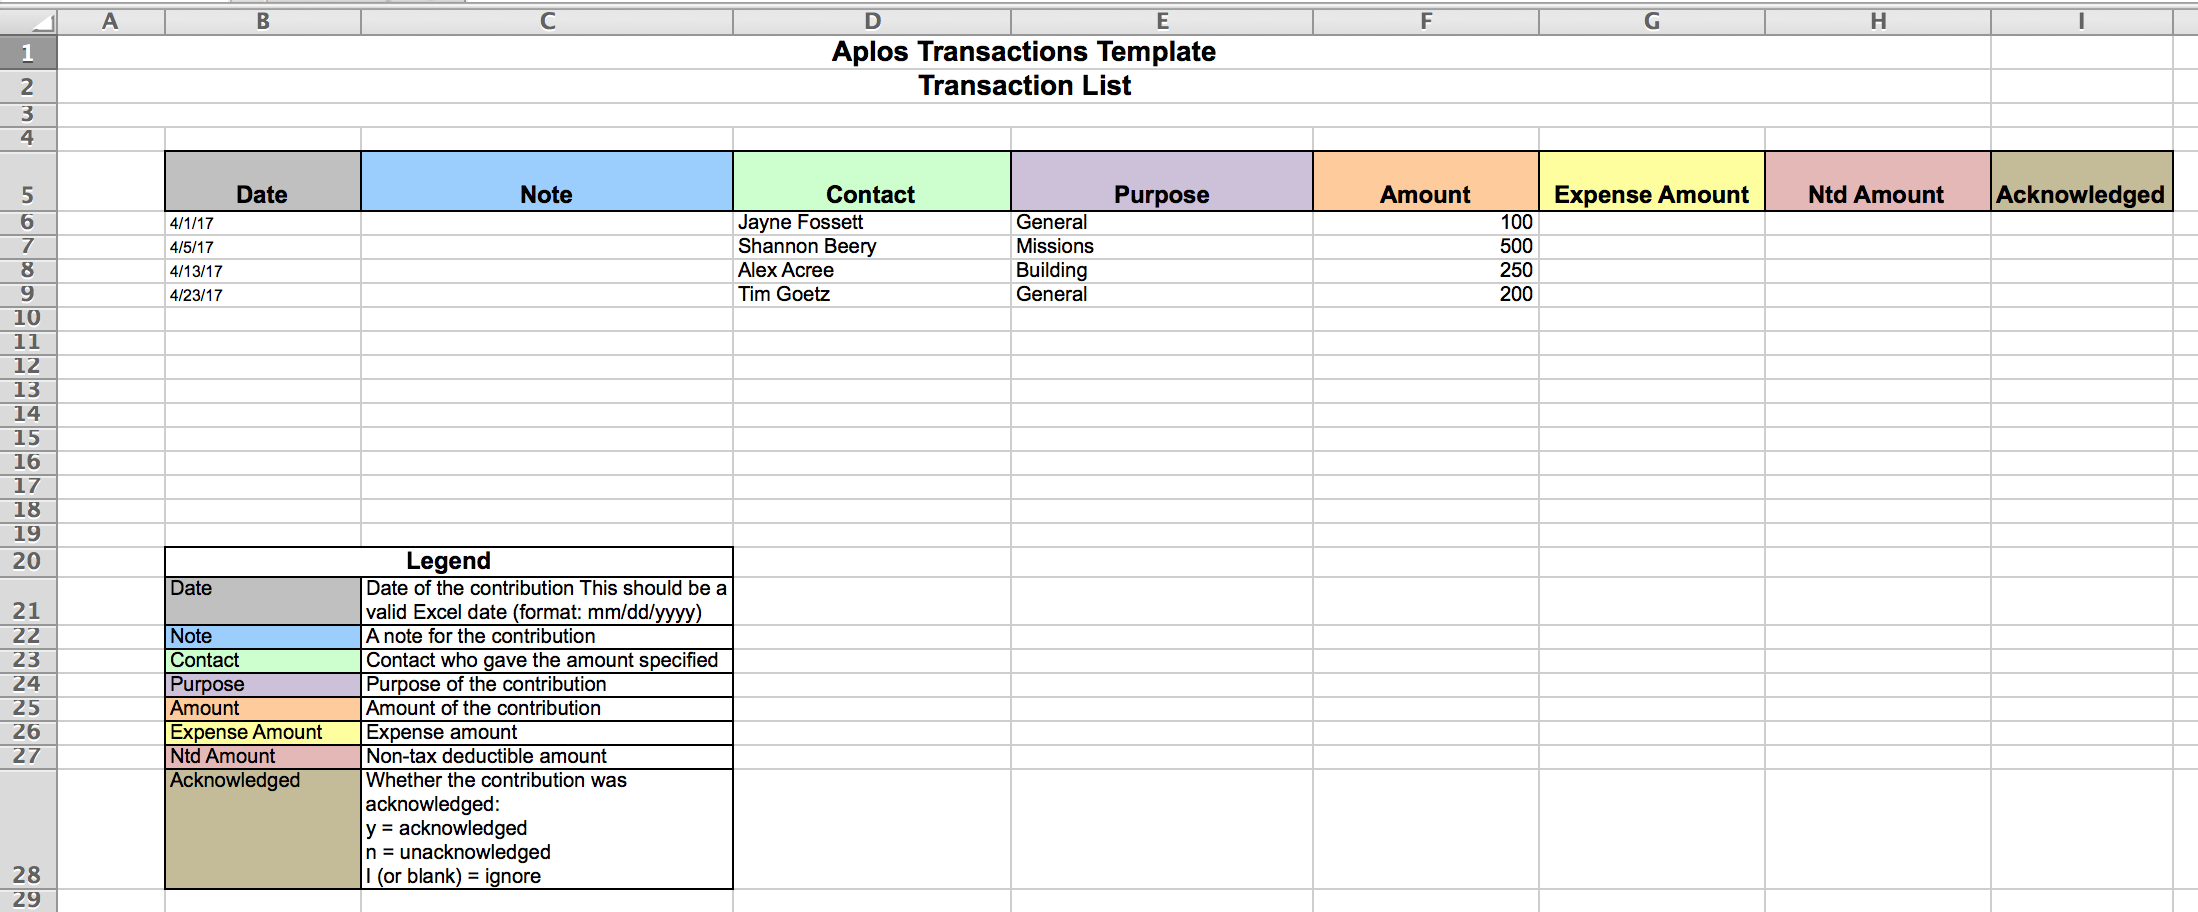
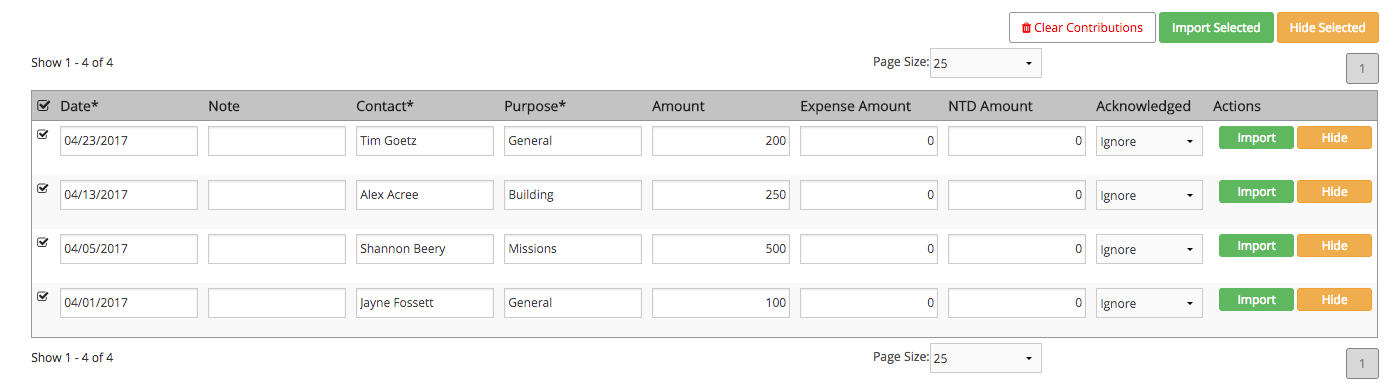
Save your file to your computer’s desktop, then drag and drop it to your import page. You will notice your donations listed on the bottom half of your page. Here, you will make any changes to the donations if needed, then import. Select donations from the import list by checking the box on the left of the donation, then click Import Selected. If you would like to import all donations on the list, check the box on the header of the list, then click Imported Selected.
Importing these will save them as a Contribution. If these donations should reflect as a deposit in your Accounting, you can do this from your Contributions page. Check the box for each of these donations in the Deposit column, then click Create Deposit. After clicking Create Deposit, the Contributions Deposit form will open, where you will select the date of your deposit, add a batch name, description, choose the bank account which this deposit should reflect in, and click Save.
You’re on your way to better donation tracking and donor management! Feel free to watch this video to see the process explained above: