Aplos partners with PEX to provide Aplos customers based in the United States with Visa prepaid cards that empower staff and volunteers to make authorized purchases, while maintaining tight spending controls. Once you have enabled prepaid cards in Aplos and successfully created your PEX account, you can connect your PEX account with Aplos to automatically sync approved transactions with your accounting once a day.
If you haven’t created a PEX account yet, check out our resource on Prepaid Cards With PEX. If you already have a PEX account outside of Aplos, contact our Support Team to request to migrate to the discounted Aplos plan.
Note: Please follow the instructions below in order as you will need to complete a series of steps before opening the PEX Connector to successfully set up your integration.
Tracking PEX Prepaid Cards In Your Aplos Chart Of Accounts
Before setting up the integration, create the accounts you wish to use in your chart of accounts in Aplos. These will be visible in PEX to assign to your transactions.
Create an asset account for tracking your account balance in PEX
This will allow you to map all PEX purchases and transfers against a single asset account. If you need to create an asset account, see our guide for setting up your chart of accounts in Aplos. You only need to create one asset account regardless of the number of cards you issue. Mark this asset account as a ‘Register’ account in order for it to appear in the PEX connector.
Note: Individual card balances will be visible from the prepaid card screen in Aplos.
Accounts, funds, and tags for expense tracking
When you create accounts, funds, and tags to track your expenses, these will sync to PEX so you can assign them to your transactions. After connecting Aplos and PEX, when you add additional accounts, funds, or Aplos tags, the integration will sync daily and update your PEX account with new options.
Create Aplos tags to track individual prepaid cards (optional)
Aplos tags will help further categorize your transactions for more detailed reporting by cardholders. This is an optional upgrade to your Aplos subscription. For more information, see our guide on Aplos accounting tags.
How To Import Transactions From PEX
Step 1: Authenticate Your Pex Account In Aplos
To connect your PEX account to Aplos, log in to your Aplos account. From the navigation bar, select “Fund Accounting” and then “Prepaid Cards.” Then sign in to your PEX account. Click “Login to PEX” and enter your PEX credentials.
If you have not created a PEX account or did not do so from within Aplos, reference our guide for getting started with PEX, or reach out to our Support Team.
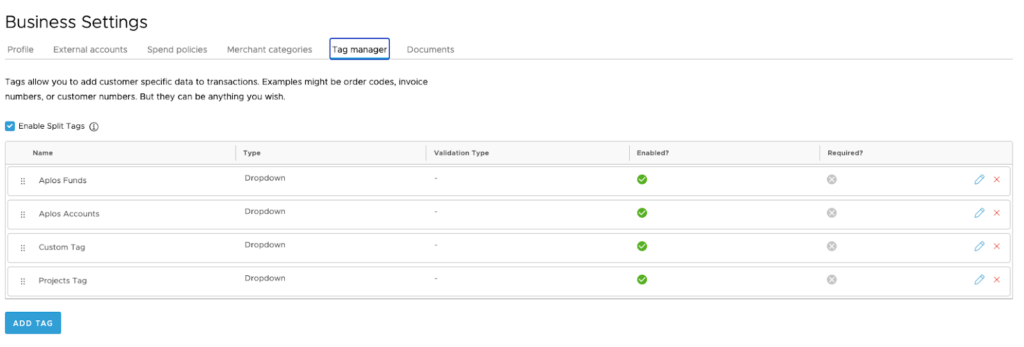
Step 2: Creating PEX Tags In The PEX Admin Portal
PEX tags are a way to categorize transactions inside PEX, and they will allow you to map and sync transactions to Aplos. You will create PEX tags that associate with Aplos accounts, Aplos funds, and Aplos tags (optional). Creating these tags in PEX first will allow for simple configuration when mapping PEX tags to Aplos accounts, funds, and tags in the Aplos Connector.
To begin creating the necessary tags in PEX, select “Business Settings” in the navigation menu, and click Tag Manager. From here, you can create and manage your PEX tags. For more information about PEX tags, see the PEX resource for creating and setting up tags.
Create A PEX Tag For Aplos Funds
Creating an Aplos fund tag is a requirement to sync successfully. Below are the steps to create your PEX tag that will sync with your Aplos funds. When synced successfully, you will see your full list of Aplos funds in this field in PEX.
- Click “Add Tag” and enter a name, such as “Aplos Funds” to help organize and differentiate your PEX tags.
- Enable the required field option. This will require all transactions to have an Aplos fund tag applied so they sync successfully.
- Select the Tag Type “Dropdown.”
- Click “Add a New Option,” and provide a name and description under the “Display as” and “Option Value” column.
- Click “Create a Tag.”
Note: You will need to provide at least one option in the new dropdown field to save the tag. When configuring the PEX Connector later in your setup, the connector will sync your funds, accounts, and tags, and create them as options in the dropdown for the selected PEX tag. Once you have set up the connector sync, you can disable the option you created to set up each PEX tag.
Create A PEX Tag For Aplos Accounts
Creating an Aplos account tag in PEX is required to sync successfully. You will repeat the same steps used to create your tag for funds. When synced successfully, you will see your complete chart of accounts in this field in PEX.
- Click “Add Tag,” and enter a name, such as “Aplos Accounts.”
- Enable the required field option. All transactions must have an Aplos account tag assigned to sync successfully.
- Select “Dropdown” as the Tag Type.
- Click “Add a New Option,” and provide a name and description under the “Display as” and “Option Value” column.
- Click “Create a Tag.”
Create A PEX Tag For An Aplos Tag Layer
If you wish to use any Aplos tags when tracking transactions in PEX, you have the option to create an additional PEX tag. This tag will further categorize transactions beyond fund and account.
- Click “Add Tag” and enter a name. We recommend using a name such as “Aplos Department Tags.”
- Select the Tag Type “Dropdown.”
- Click “Add a New Option,” and provide a name and description under the “Display as” and “Option Value” column.
- Click “Create a Tag.”
Note: If you have multiple Aplos tag layers created, you will want to create a PEX tag for each layer.
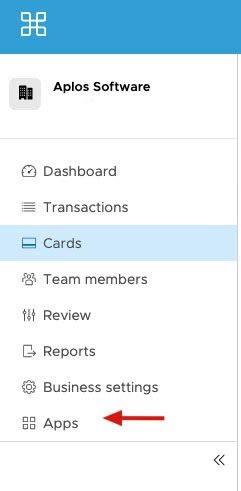
Step 3: Launch The Aplos Connector In PEX
Once you have logged in to your PEX account and created your PEX tags, locate and click “Apps” on the left side of your PEX menu. Next, locate the installed app PEX Connector for Aplos and click “Launch.”
Step 4: Choose What To Sync In The PEX Connector

- Sync Aplos funds and accounts to PEX tags.
Enable this to successfully retrieve your funds and account list in Aplos. This is required to successfully sync purchases. - Automatically import all PEX purchases to Aplos.
Enable this option to allow PEX to import PEX purchases as expenses in Aplos. You can choose to sync all PEX transactions (regardless of approval status) or just approved ones, but note that transactions must have at least a PEX account tag and PEX fund tag assigned in order to sync. For details on transaction review, see the PEX resource on reviewing transactions. - Automatically import PEX transfers to Aplos.
Enable this option to have PEX import transfers to your Aplos account. An example of a transfer would be an ACH/wire transfer from your business checking account to your PEX business account. - Automatically import fees to Aplos.
Enable this option to have PEX import PEX account fees to your Aplos account. - Choose an account in Aplos to represent your PEX funds.
Choose the account you created in Aplos to sync all PEX transactions. We recommend creating an asset account in Aplos called “PEX.” By using an asset account, you will be able to see all of your PEX purchases in an account register in Aplos. - Create a contact for each unique merchant (optional).
Choose whether you wish to select a single contact for all purchases or create a unique contact for each merchant. - Specify a start date for the sync.
Transactions after this date will be synced automatically.
Step 5: Configure PEX Tag Mapping
With the PEX Connector, your Aplos chart of accounts and Aplos tags sync so you can see your Aplos account, Aplos fund, and Aplos tag in PEX. These will appear as fields when you are tracking your purchases in PEX. To begin, map the Aplos account, fund, and tag field name to the corresponding PEX tag you created in Step 2.
Note: Your Aplos account and Aplos fund are required fields to import transactions from PEX and must be assigned a PEX tag.
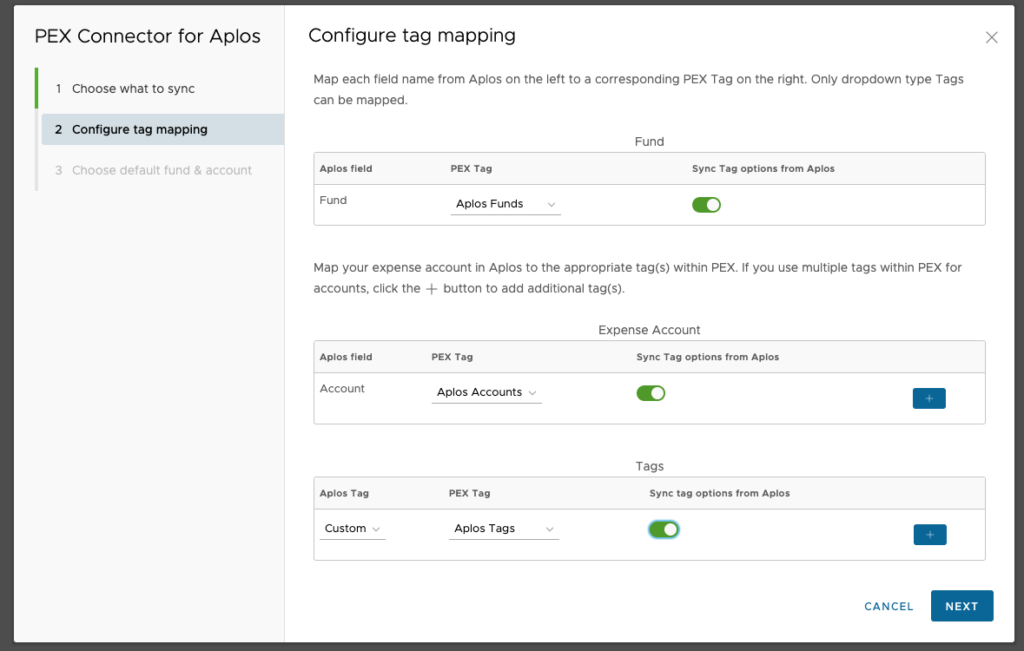
- Fund (required)
The Aplos field “Fund” should be mapped to the PEX tag called “Aplos Funds.” This is a required field to map in order to successfully sync transactions. - Account (required)
The Aplos field “Account” should be mapped to the PEX tag created for “Aplos Accounts.” This is a required field to map in order to successfully sync transactions. - Tag (optional)
If desired, PEX tags can also be mapped to your Aplos tags if they are enabled in Aplos. If you have a tag layer that is required in Aplos, it will be required to map this field in PEX to successfully sync transactions. If you have multiple Aplos tag layers, select the blue plus sign (+) on the right side of your screen to map a PEX tag for each tag layer.
Syncing Tag Options From Aplos
Syncing tag options is recommended because it gives you the option to import data from your Aplos account when configuring your PEX tags. For example, the values for the PEX tag will be populated with the names of all your accounts. This helps reduce manual efforts to populate PEX tags with the data from your Aplos account.
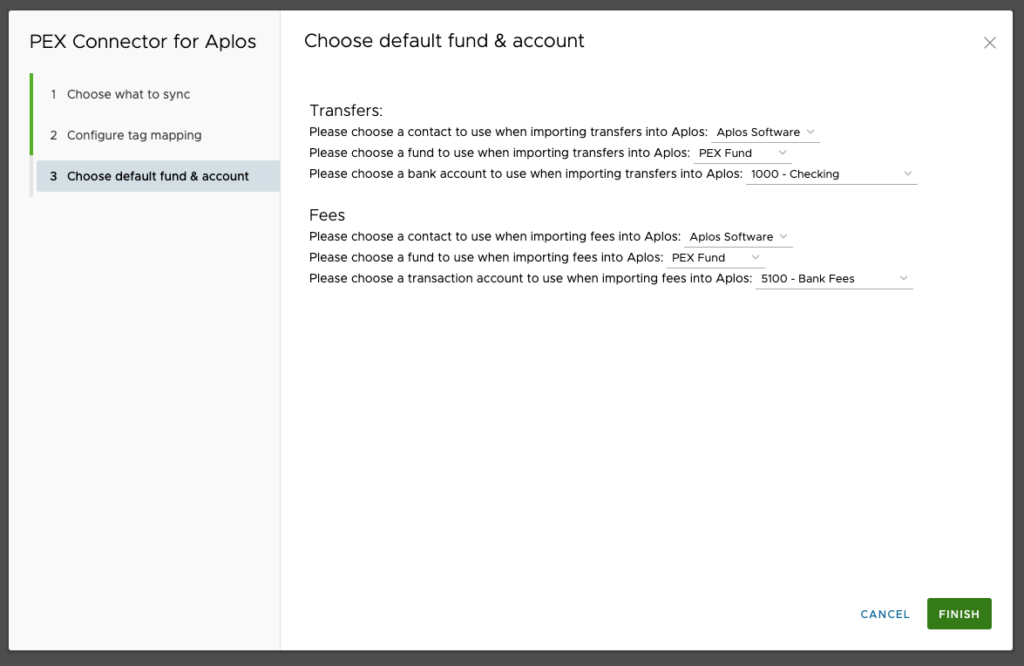
Step 6: Choose Default Fund And Contact PEX Transfers And Fees
- Transfers
When you fund a PEX account via either an ACH transfer or wire transfer, the transfer is created as a debit in the selected bank account you use to fund your account and a credit in the asset account you chose for your PEX funds (in Step 4 of this connector). You must also select an Aplos fund and contact record for transfers. - Fees
If you incur any PEX account fees, the transactions for those fees will be imported to Aplos and assigned to the account, fund, and contact you select.
Assign Aplos Accounts And Funds To PEX Transactions
Review Transactions In PEX To Sync With Aplos
To sync your transactions log in to PEX and follow either of the options below based on your configuration:
- If “Automatically import all PEX purchases into Aplos” was selected in Step 4
A cardholder or administrator will need to select a PEX tag for both an account and fund of their choosing (and any Aplos tag options, if applicable) for each transaction you want to sync. Once these are selected, the transaction will automatically sync with Aplos.
- If “Automatically import approved PEX purchases” was selected in Step 4
A cardholder or administrator will need to select a PEX tag for both an account and fund of their choosing (and any applicable Aplos tag options) for each transaction you want to sync. Selecting these and/or adding a receipt image will move the transaction into the PEX Review queue for review and approval.
To review your transactions, click “Review” from the menu on the right side of your screen in PEX. Then click “Not Reviewed.” This will provide you with a list of transactions that need approval. For more information on transaction review, see the PEX resource for reviewing transactions. Transactions will sync with Aplos once they are assigned the Approved status in PEX.
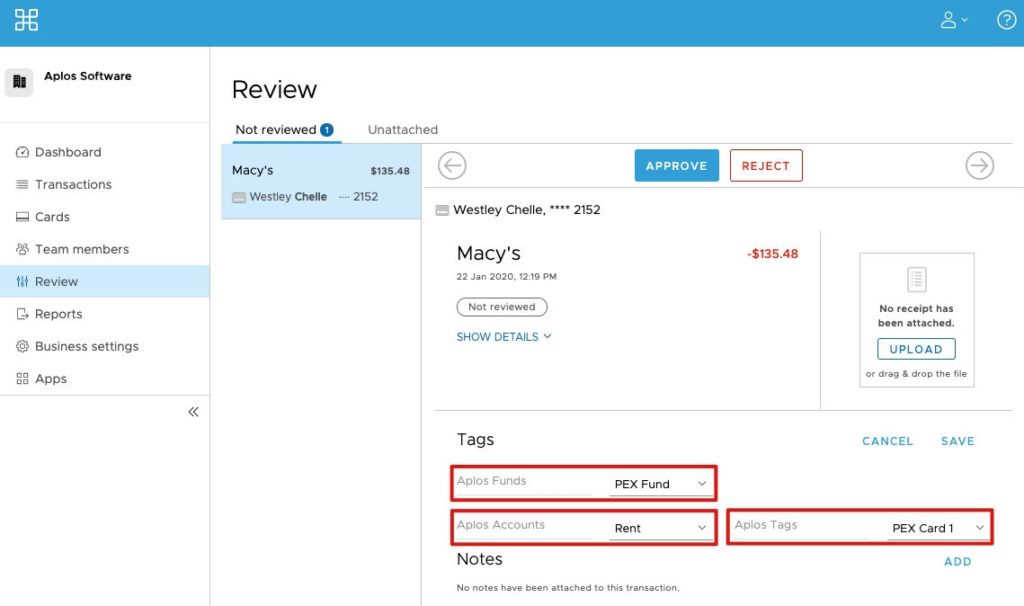
Assign Account And Fund To Each Transaction
When reviewing a transaction, ensure that you meet the following requirements in PEX to successfully sync the transaction to your Aplos Account:
- Each transaction has a PEX tag that is mapped to an Aplos fund.
- Each transaction has a PEX tag that is mapped to an Aplos account.
- If you have a required tag in Aplos, each transaction must have a PEX tag that is mapped to a required Aplos tag.
If desired, you have the option to split a transaction in PEX, which will import a split transaction to Aplos. For more information about splitting tags, see the PEX resource for splitting tags.
After selecting the appropriate fund, account, and tag (optional), click “Save” and either “Approve” or “Reject.” An approval is required for syncing transactions if that option was selected in the initial configuration.
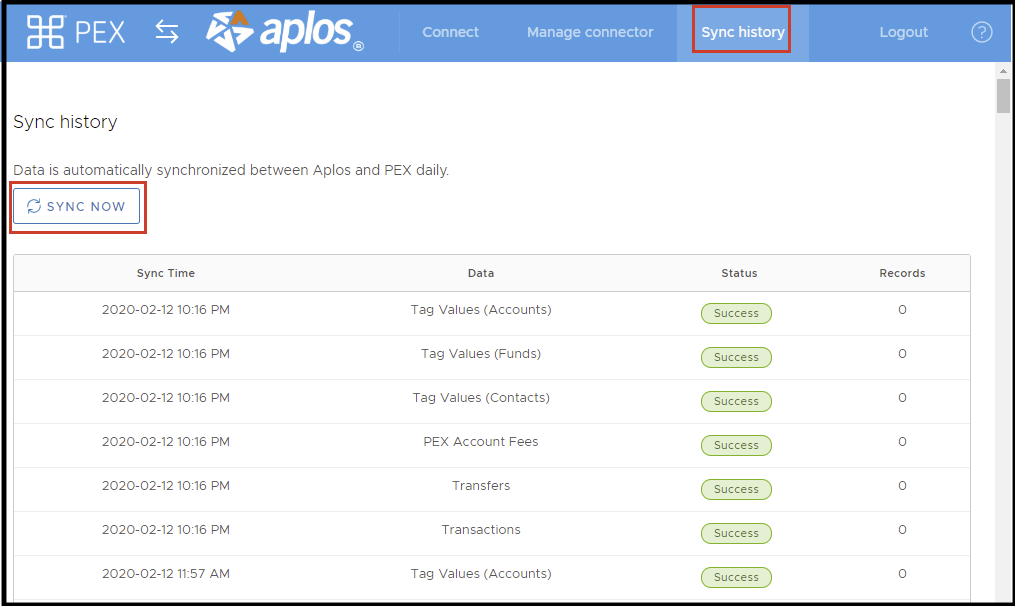
How To Sync Approved PEX Transactions
The PEX Connector will automatically sync your accounts, funds, tags, and transactions with Aplos every 24 hours. If you wish to sync immediately, you can open the PEX Connecter and go to Sync History. Then click the Sync Now button to trigger an immediate sync.
Click “Sync History” to view details and confirm that your account is syncing as expected.
Automatic Import Of Bank Transfers To PEX
Transfers that occur from your external bank account to your PEX account will be synced to your Aplos account automatically. These will be posted based on the account, fund, and contact selected in Step 6 of your PEX Connector configuration. To learn more about how to create a transfer and fund your PEX account, refer to PEX’s guide for how to fund from an admin site. No additional action is required.
Viewing PEX Transactions In Aplos
Viewing Purchases In The PEX Register In Aplos
Once you have configured your PEX Connector and initiated the process to sync transactions and transfers, the PEX Connector will then import approved transactions to your accounting in Aplos. You can view PEX transactions from the Register screen for your PEX asset account under Transaction History in Aplos. You will also be able to view any transfers and fees that occur.
To see your PEX register, select “Fund Accounting” from the navigation menu. Then click “Transactions” and “Registers” to select the asset account for your PEX account.

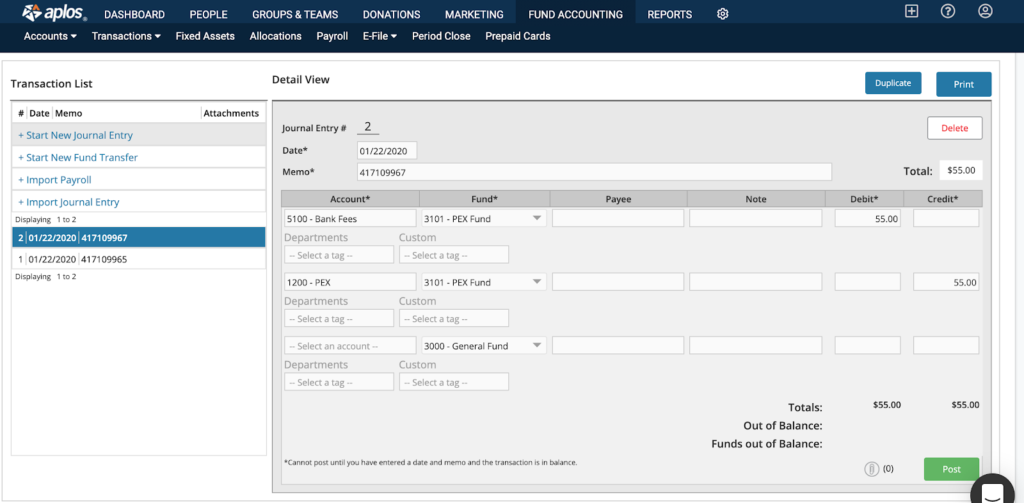
Viewing PEX Bank Transfer Journal Entries
You can also view a list of your bank transfers from the Journal Entry screen by selecting “Fund Accounting” in the navigation menu, and then clicking “Transactions” and “Journal Entry.”
Viewing Prepaid Card Balances In Aplos
Once you have logged in to PEX from inside Aplos, open cards will be displayed on your Prepaid Cards screen in Aplos.
From this screen, you can check the balances, expiration dates, card numbers, and names of the cards issued. On the right side of the screen, you will have options for refreshing your card list, managing your PEX account, or unlinking your PEX account.

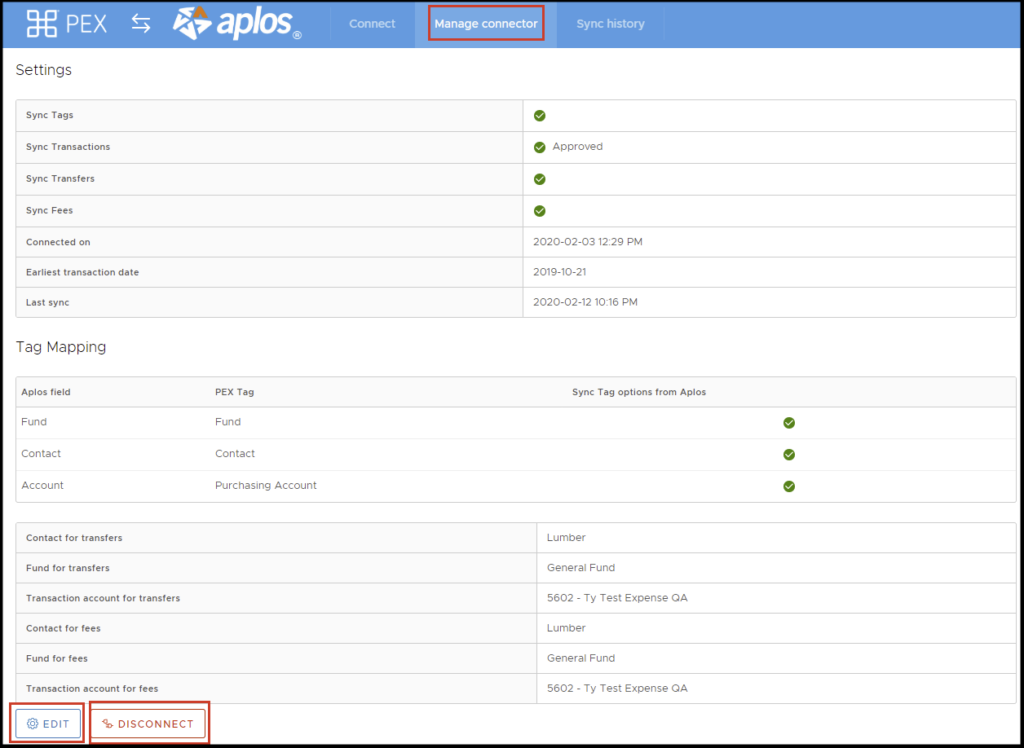
Managing Your PEX Connector Configuration
- In the PEX Admin Portal, click “Manage Connector” from the top navigation to review or edit your configuration.
- Click “Edit” at the bottom of the screen to make any changes in the configuration settings.
Note: The Disconnect button at the bottom of the screen can be used to disconnect your Aplos account from your PEX account.