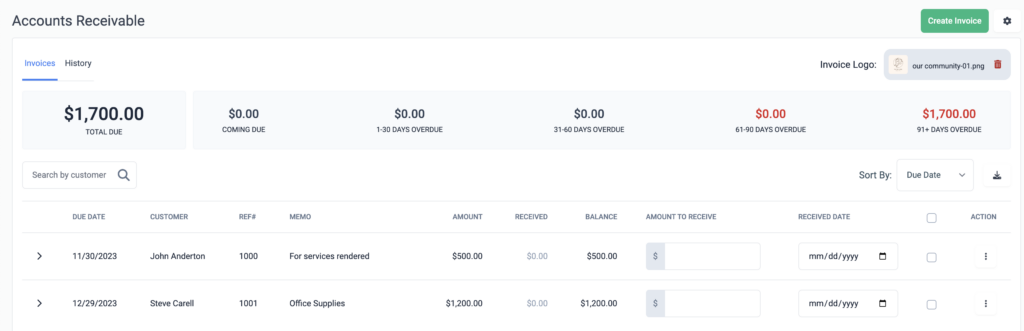
The Accounts Receivable screen of Transactions allows you to create and track invoices you need to issue. From here, you can quickly create a customizable invoice, record payments received on the invoice, and monitor the remaining balance. You can get to this screen by selecting “Fund Accounting” in the menu, hovering over “Transactions,” and selecting “Accounts Receivable.”
At the top of the page, you’ll see any outstanding invoices you’re expecting as well as an aged breakdown of the total amount that is due.
Adding a New Invoice
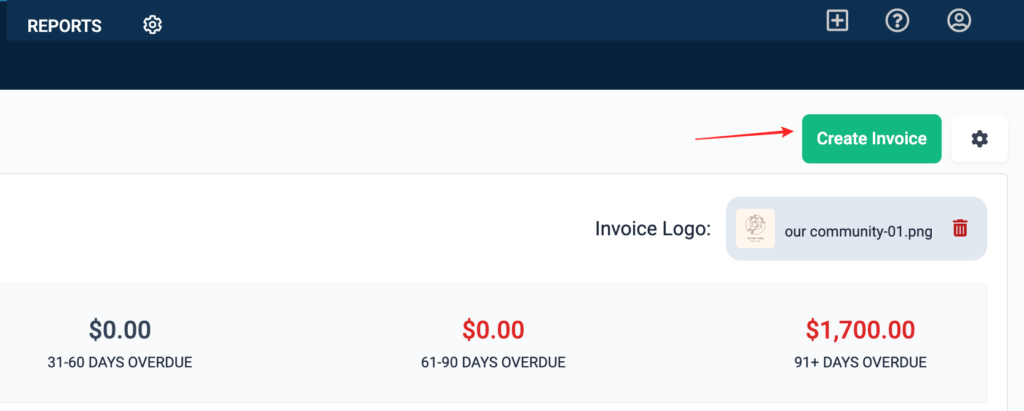
Select the green Create Invoice button at the top right to add a new invoice.
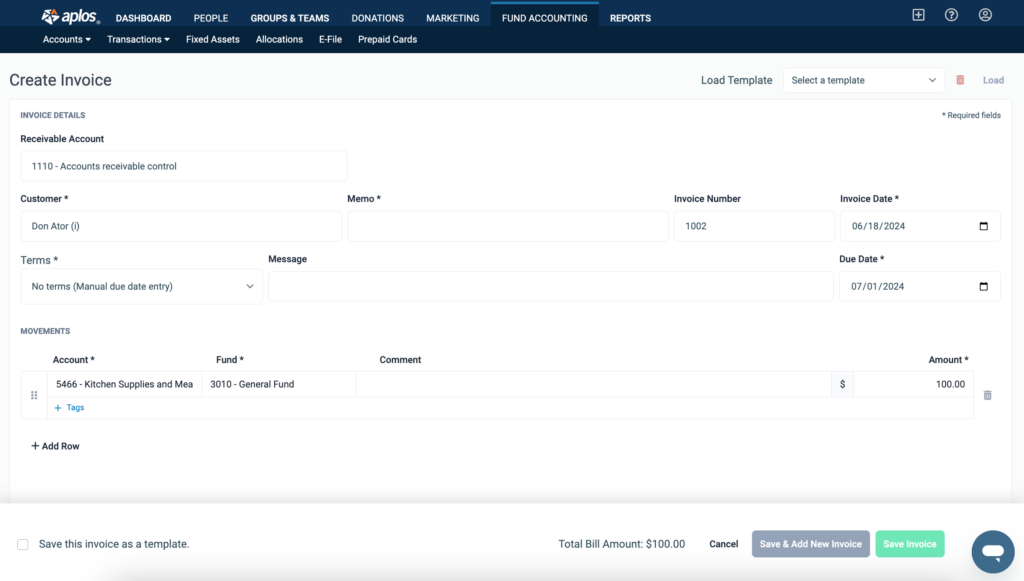
From here, you can create an entirely new invoice or use one of your saved templates. Once you’ve customized the invoice as needed, click the green Save Invoice button to save and post it.
If you’ve created an invoice that you’d like to save as a template, check the box next to “Save this invoice as a template” and give it a name. This will allow you to use this template to create future invoices more efficiently.
Adding Recurring Invoices
If you have the Recurring Transaction feature enabled you can create recurring invoices to occur on a consistent basis. You will be able to set the contact, the memo the amount. Then you can schedule the invoice to automatically be created on a scheduled basis. For more information on how to create, edit, and update recurring invoices, check out our resource on Recurring Transactions.
Invoice Logo
When creating invoices, you can place your organization’s logo as a header to create a professional-looking invoice. To start, click the Upload button next to “Invoice Logo” toward the top right of the page. If a logo is already set, you can click “Show” to reveal the current logo.
Once clicked, a popup box will appear, click “Choose File.” Please read the description of which image files are best suited to be uploaded. Locate and select the file on your computer that you wish to use as your logo. and click “Upload.” Once completed your new logo will appear at the top of your invoices.
Once clicked, a popup box will appear. Select “Choose File.” Be sure to read the description of which image files are best suited to be uploaded. Locate and select the file on your computer that you wish to use as your logo. and click the Upload button. Once completed, your new logo will appear at the top of your invoices.
Duplicating an Invoice
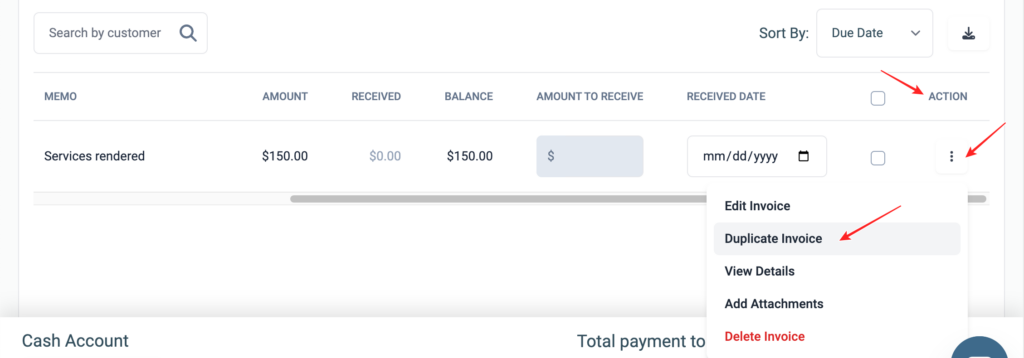
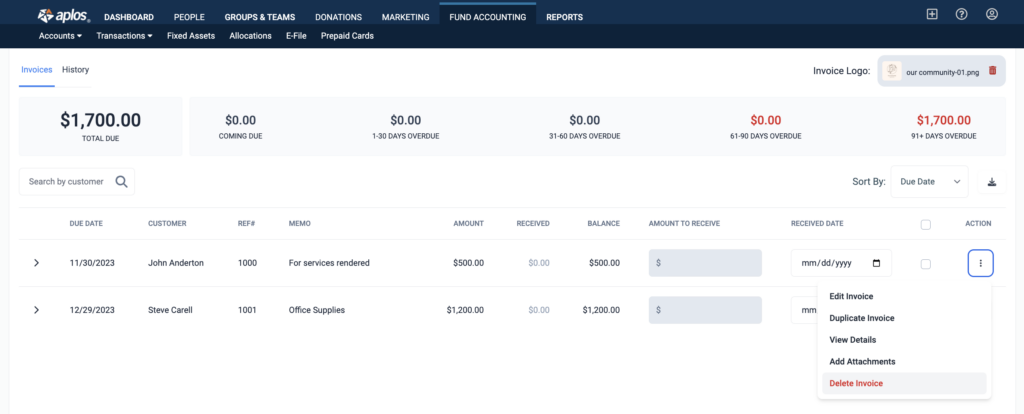
To duplicate an active or closed invoice, locate the invoice you wish to duplicate. Select the three dots under Action on the far right. You will see the options to Edit Invoice, Duplicate Invoice, View Details, Add Attachments, and Delete Invoice. Select “Duplicate Invoice.” From here, the selected invoice will be duplicated and you can make any adjustments to the copied invoice. This will not impact the original invoice as it will remain in its original state.
Deleting an Invoice
If you’ve created an invoice in error, or if you decided to track your income differently, you can delete it. Hover over the three dots under Action on the right for the invoice you wish to delete, and select “Delete Invoice.” A popup will appear asking you to confirm your choice. If you wish to continue, select “OK.” If not, select “Cancel.” Note: If you have recorded any payments on this invoice, you will need to delete those first.
Printing or Emailing an Invoice
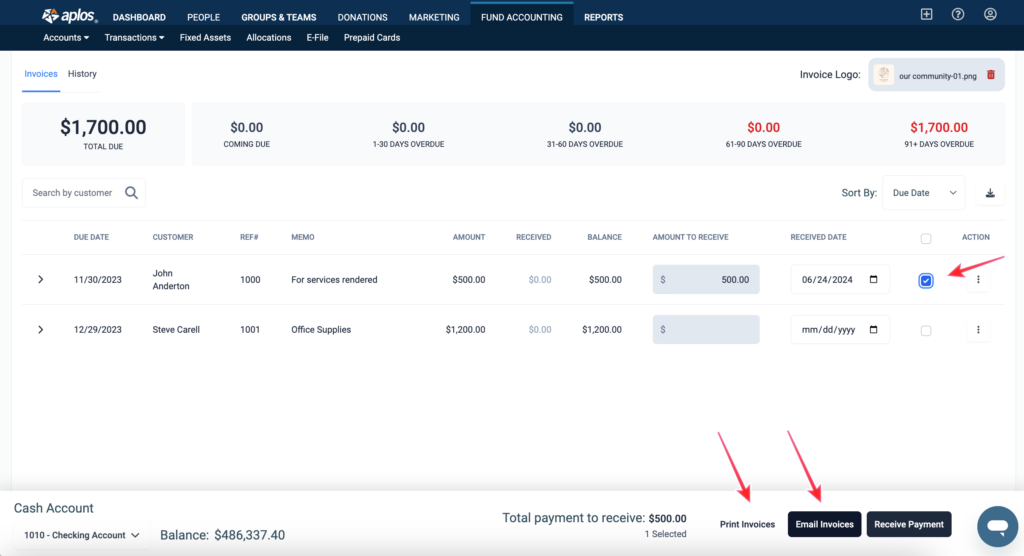
You can easily print or email an invoice from this screen. Check the box to the right of the invoice and then choose the desired option below.
Receiving Debit or Credit Card Payment for Invoices Online
Email Invoices for Payment Online
In Aplos, your invoices in Accounts Receivable can be emailed and paid online. This means you no longer have to print an invoice, wait for a check to be mailed, or manually enter a receipt to complete an invoice. This also makes it simple for the payee to immediately receive the invoice, and conveniently, securely pay that invoice online using a credit or debit card.
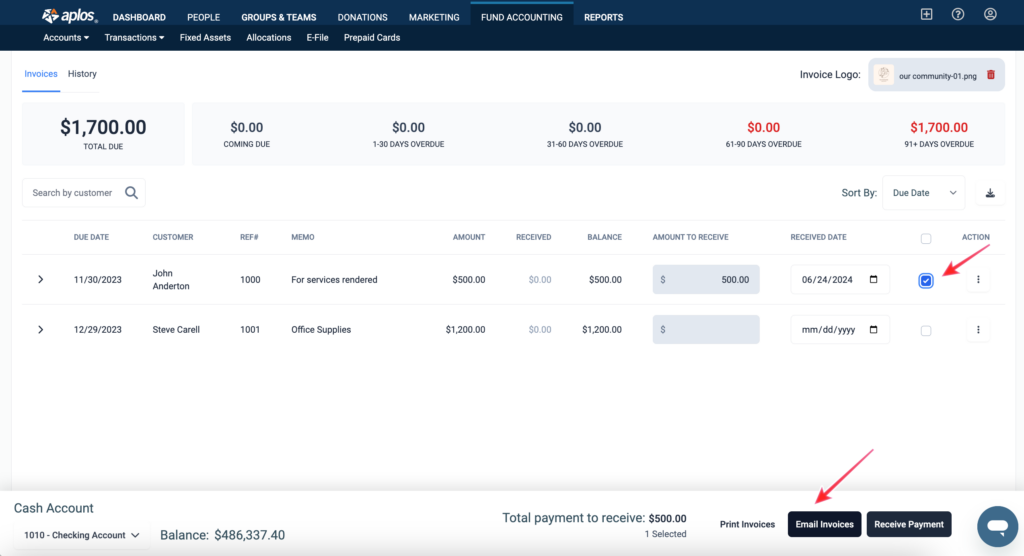
When you create an invoice, you can select which invoices you would like to print or email. Once they have been selected, and the payment date and amount are entered, click “Email Invoices” to continue.
Create Account to Receive Payments
On this screen, you will first want to create your merchant account. When you create your merchant account you will be taken through a setup wizard to continue your setup. Do not attempt to receive any invoices until your merchant account is verified. See the AplosPay Setup Guide for more information on setting up your merchant account.
You can click on the email you are sending and configure the message. The email that is sent can be a custom message or a default message that is applied to all emails.

How Customers Can Pay Invoices Online
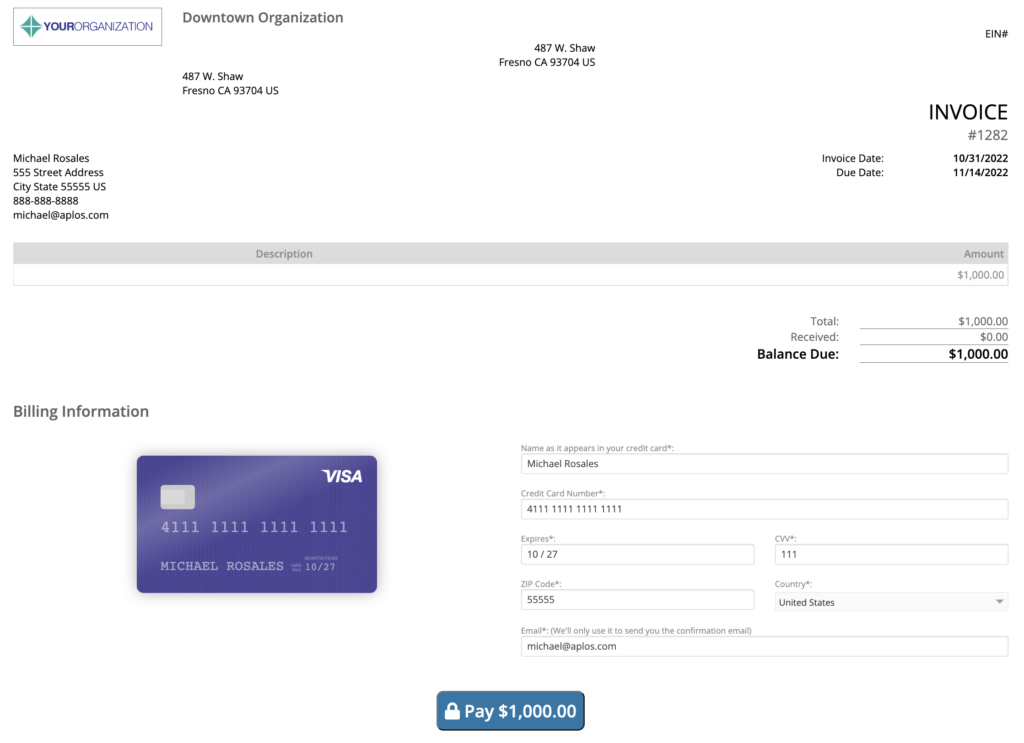
When the email is sent, the customer will see the custom or default message, an attached PDF copy of their invoice, and a link for them to pay their invoice online.

On the payment page the customer can verify the invoice information and enter their credit or debit card details to pay the invoice. Only the full amount of the invoice will be receivable online.
After the payment is received the customer will receive an email from Aplos, and you will receive an email from our payment processor with the payment information. In Aplos, the invoice will now be fully received and cleared out of Accounts Receivable.
How to Receive Payment for Invoices
To record a received payment manually, enter the amount received and the date and click the receive payment button, which will post a deposit in your register for you. You can also export your open payments by clicking Export Summary.
Recording a Single Payment to Receive Multiple Invoices
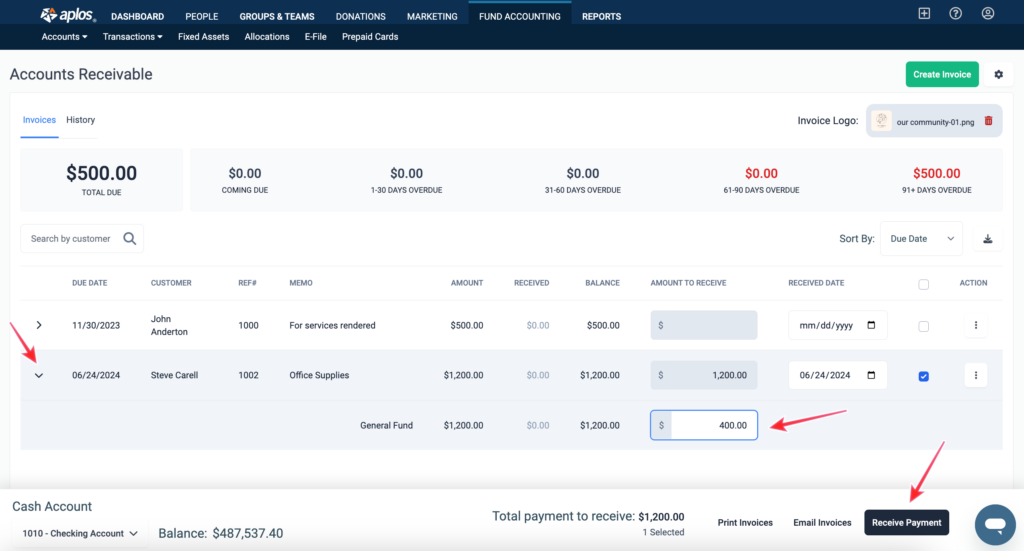
You might have situations where you’ve received a single check from a customer for payment on multiple open invoices in Accounts Receivable. You can record multiple payments and these will show as a single deposit in your asset account’s register. Batching these will help simplify your reconciliation process as your deposit amount will match the amount on your bank statement.
You will need to enter the amount that you are receiving for each invoice.
To enter a partial payment of the invoice, select the arrow to the left of the invoice. An additional line will appear below the total so you can enter a partial amount. After you’ve entered the amount, select “Receive Payment.”
To receive payment for the entire invoice, simply check the box to the right of the invoice and select “Receive Payment.”
If you have more than one invoice for a customer, when you enter the amount and date on your first invoice, you will see that the same date will auto-fill on any other open invoices for that customer, so you will only need to enter the amount received on any other open invoices.
When you click the Receive Payment button, this will record the payment amount in the Amount Received column and update the Balance to reflect only what is outstanding. If the amount received pays the invoice in full, then you’ll see that the invoice moves to the History section on the page.
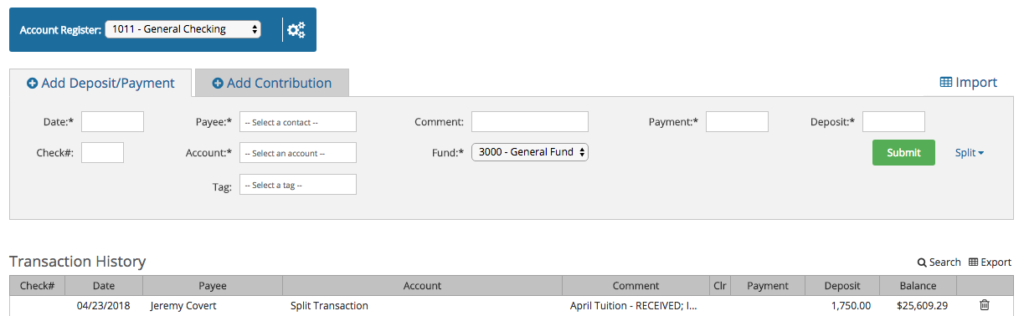
Payment on Multiple Invoices Appears in the Register
If you receive payments on multiple invoices at the same time, you will see this reflected in the transactions recorded in your register. The deposit amount will be the total amount received on both invoices. For example, if you had two amounts of $1,000 and $750, they will reflect as a lump deposit of $1,750.
If you do not want to collapse these deposits into a single transaction, you will need to record each amount separately. To do this, you will need to enter the amount and date on one invoice and click “Receive Payment.” Then go back into the Receivables module, record the second amount and date, and then click “Receive Payment.”
See Invoice History
The History section of the page is a list of invoices that have been paid in full. Navigate to this section by selecting “History” at the top of the page.
You can click on the date of any invoice listed to view the details of the invoice.
Opening a bill that has had payments recorded to it will include a list of the payment transactions. You can print a paid invoice to view a fully paid balance by selecting the Actions menu at the top right and clicking “Print.”
Reports
Aged Receivables Report
You can utilize the Aged Receivables Report to view a list of your active receivables. Then you can sort and filter your receivables to see a running balance by contact and the timeframe the balance is due. Once sorted and filtered, you can print, download, or save the reports to your Saved Reports section.
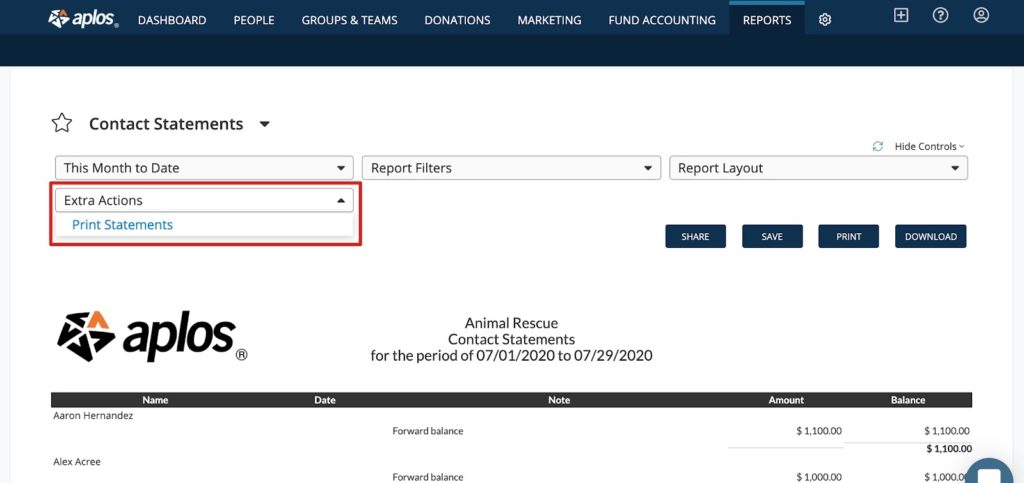
Contact Statement Report
The Contact Statements Report allows you to send a statement that displays the remaining balance of a contact’s invoice. To get started, locate the report in the Reports section. You can select the timeframe you wish to view the report as well as filter contacts or lists. Once complete, click “Extra Actions” and select “Print Statements.” From there, you can choose to display your logo or upload a new logo. You can also type a message that will appear on the statement. Once you are ready, click “Print.” This will begin downloading statements for all contacts on your report under a single file.
How to Record Bad Debt on a Receivable
Bad debt is an amount that is owed to your organization that is not going to be paid by the customer for one reason or another. You can now close out your receivable with an expense account. This will allow you to track any income that was received, but then also track the expense for the unpaid difference. Examples might be tuition, membership dues, or a service performed by your nonprofit.
Using Your Expense Account in Accounts Receivable
You can create an expense account for this type of situation from your Chart of Accounts. You might call this expense account Bad Debt, or Allowance for Doubtful Accounts. The name of this account is up to your organization. Within the Expense section of your Chart of Accounts, click the + button on the account group that you’d like to add this account, assign a number and name, and then click “Save.”

Posting a Negative Amount in Accounts Receivable
Now that you have your account created, you can use it to close out any receivables that you are not expecting to receive payment on. It is up to your organization to decide when you decide to mark these unpaid receivables as bad debt. You will go into your Accounts Receivable module and scroll down to the Receive Payments section. You’ll first need to edit your original receivable to change the amount and also split it between your income account and the expense account for bad debt. To do this, click on the Due Date, which will make the receivable available for editing.

Once your receivable is open in edit mode, you will edit the Amount of the invoice to only the amount received, and also split the original invoice to count the unpaid amount to your expense account for bad debt.
Closing Out Incomplete Receivables
In the case from the example above, you have a receivable for $1000 and only $200 was received. You will edit the amount of the receivable to $200, then split it so that the original billed amount of $1000 is counted as income, and the remaining $800 is counted as a negative amount to your expense, netting the two amounts to $200. See example below:
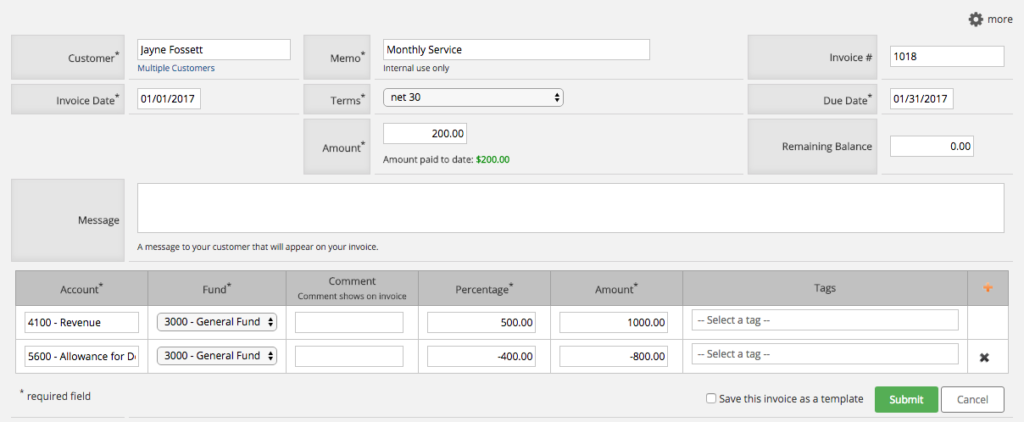
After you click Submit to commit these changes, you will now see that this invoice shows in the History (Closed/Fully Received) section of your receivables module.
If you have any questions about this process, please feel free to reach out to our Customer Support Team. We’re always happy to help!
Bad Debt in Different Period
Bad debt is an amount that is owed to your organization that is not going to be paid by the customer for one reason or another. You can close out your receivable with an expense account. This will allow you to track any income that was received, but then also track the expense for the unpaid difference.
This resource will cover what to do if you are wanting to account for this bad debt in a different year than when your invoice was originally dated for (For instance: tracking bad debt in 2019 for an invoice that was originally issued in 2018).
Creating Special Accounts for Allowance for Doubtful Accounts
In order to properly track this situation, you will want to go to the Chart of Accounts area, and create a new asset account. Call this asset Allowance for Doubtful Accounts (referred to as ADA for the rest of this article). You will also want to create an expense account for your bad debt which you might call Bad Debt Expense, or something of the like. The name for both of these accounts is up to your organization.
Closing out your Receivable
For example, let’s say that you have an invoice for $1,000 that was issued on 11-01-18. You’ve received $800 so far, but the customer will not be able to pay the remaining $200.
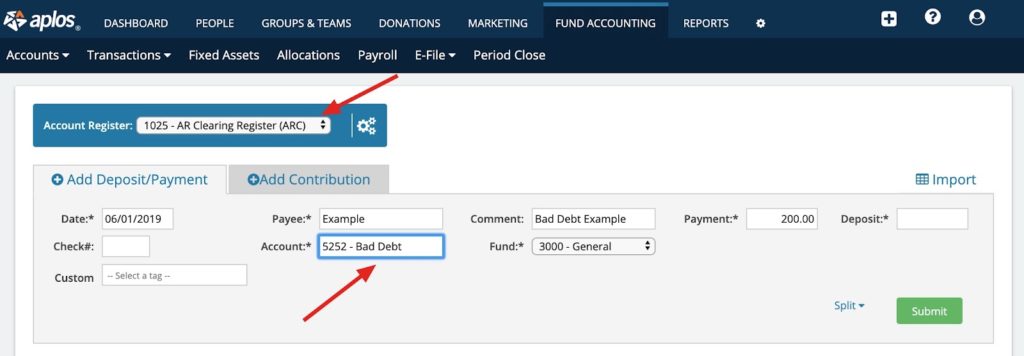
In order to close out the receivable, you will want to go to the Accounts Receivable module, and post a $200 receipt, as of the date you want to count the bad debt in (for example: 06-01-19), which will be deposited to the new ADA register.
Tracking Bad Debt Expense
From there, you’ll want to go to the ADA register and post a payment of $200, using the Bad Debt Expense account, also dated for the period you want to account this debt in.
By doing these entries, you will effectively zero-out your ADA account, and successfully account for the expense for this bad debt in the desired period.