How ACH File Exports Work
ACH File Export makes payments through your bank faster by exporting a payments file in NACHA format for outstanding Accounts Payable. This pre-formatted file can then be uploaded with your bank to start a bank transfer for a single transaction or a batch.
Your bank will complete the bank transfers through the Automated Clearing House (ACH) Network. In Aplos, your payables will be marked as paid and a voucher in the amount of the payment will be attached to the transaction. ACH File Export is an advanced feature you can add to Accounts Payable. If you wish to learn more about Accounts Payable, see the Accounts Payable guide.
ACH Payments Eligibility
To use the ACH File Export, your organization must have a bank account that will permit you to create batch ACH payments and accept a NACHA format. Prior to configuring ACH File Export in Aplos, confirm with your bank that this service is included and the bank uses the NACHA format. The ACH File Export is only supported for US banks.
If this is an included service with your bank, locate detailed instructions for the required information that must be provided in your ACH payment file. You may find this in the payments section of your bank account, or you can request it from your local banker. This information will be required when setting the configuration for the ACH File Export in Aplos.
Enabling ACH File Export in Aplos
ACH File Export is an included feature in the Advanced Accounting Bundle and is automatically enabled for these users.
If you wish to enable the feature without Advanced Accounting, visit the Subscription page under the Settings section, select “Change Subscription” and then add “ACH File Export.” You must be an Administrator of your Aplos account to change the subscription. If your account is in a contract, you can contact our Customer Success Team to get access to ACH File Export if it is not enabled.
How to Pay Bills With ACH File Export
Add Banking Information for Contacts
Once ACH File Export is enabled on your Aplos account, input your vendor’s bank account and routing number in their contact details. This information will be securely stored and will only be visible to users with role permissions of Administrator, Manager, Accounting Manager, or Accounts Payable Manager.
Search for your vendor’s contact profile, view contact details, and then select “Add Bank Information.”

From this screen, you can securely enter the vendor’s banking information.
- Standard Entry Class (SEC): Select whether the vendor’s bank is a Company or Individual bank account. Other types of accounts are not supported.
- Checkings or Savings: Select the type of account you wish to use.
- Account Number: Enter between 6 and 17 digits without any dashes, spaces, or letters.
- Routing Number: Enter a 9-digit number without dashes, spaces, or letters.
When complete, select “Save Bank Information.”

Tips for Successfully Managing Banking Information for Vendors
- Each vendor can only be tied to one bank account.
- Vendor bank accounts must be based in the United States and cannot be an online payment platform, such as PayPal.
- You can edit or update the banking information at any time.
ACH Configuration for Your Bank
To format your ACH File Export correctly, you will need to select the asset account you will use to pay your bills and enter the detailed information provided by your bank for your NACHA file.
This information will be securely stored and will only be visible to users with role permissions of Administrator, Manager, Accounting Manager, or Accounts Payable Manager. Only an Administrator, Manager, or Accounting Manager will have access to edit this information.
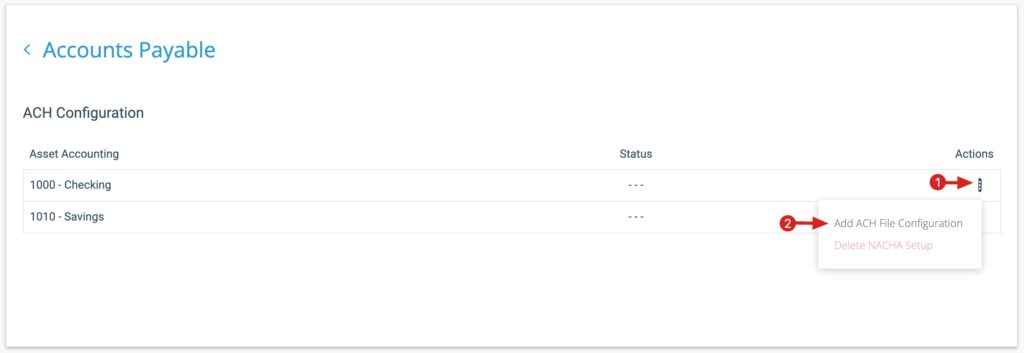
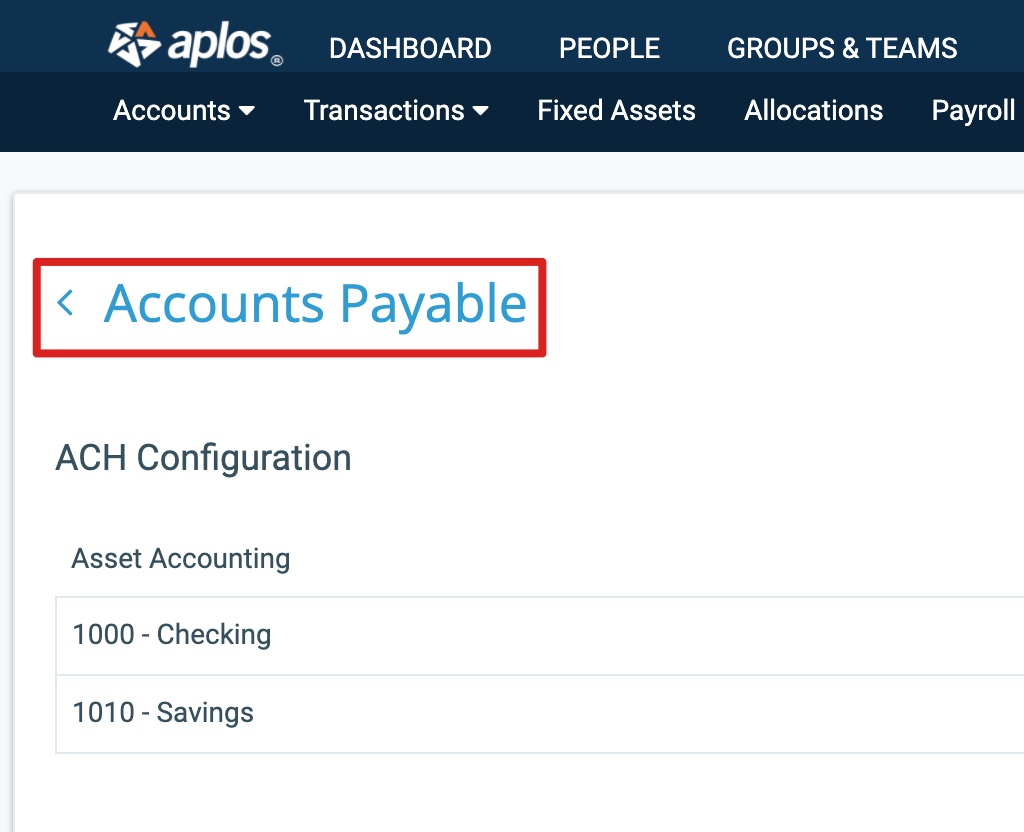
To configure your account for ACH, go to the Accounts Payable section. Select the gear icon on the top right, and then choose ACH Configuration to see a list of the asset accounts you have linked to Accounts Payable.
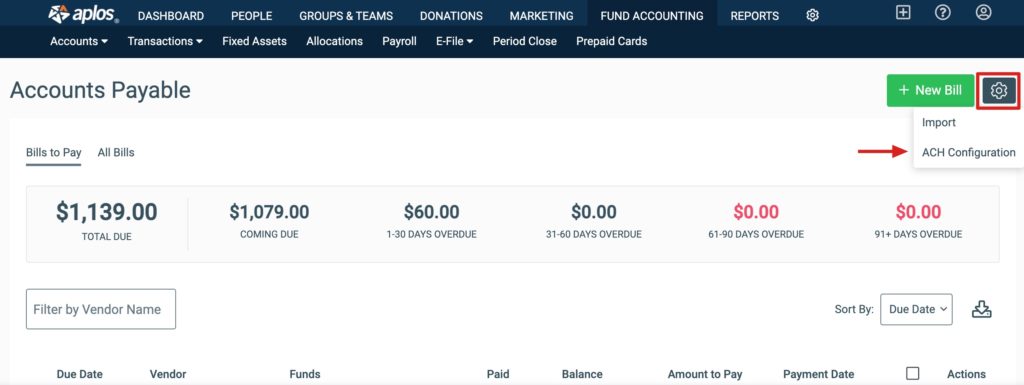
Select the asset account you wish to set up for ACH Payments by going to the dropdown menu under the Actions column. Select “Add ACH File Configuration.”
This will prompt you to insert the NACHA file requirements that were provided by your bank. If you do not have the required information from your bank, verify that your bank allows for ACH payments and accepts a NACHA file format. If this is included in your banking services, you should find detailed instructions in your bank account under the payment or ACH services area of your bank account, or you can request them from your banker.
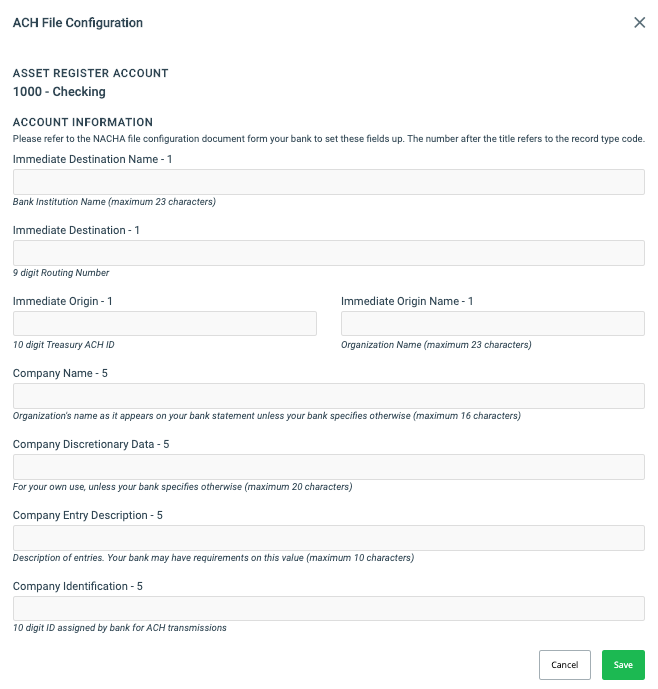
Account Information fields include:
- Immediate Destination: 9-digit routing number
- Immediate Destination Name: Bank Institution Name (Max. 23 characters)
- Immediate Origin: 10-digit Treasury ACH ID
- Immediate Origin Name: Your Organization Name (Max. 23 characters)
- Company Name: Organization’s name as it appears on your bank statement, unless your bank specifies otherwise
- Company Discretionary Data: For your own use, unless your bank specifies otherwise (Max. 20 characters)
- Company Entry Description: Description of entries; your bank may have requirements on this value (Max. 10 characters)
- Company Identification: 10-digit ID assigned by the bank for ACH transmissions
Once the required information is entered, click “Save.”
Tips for Successful ACH Configuration
- Most bank instructions are very specific about uppercase and lowercase letters, and whether to include spaces. Follow the instructions provided by your bank, exactly as specified.
- If you have any questions about the instructions provided by your bank or cannot find the information, contact your banker to ensure you have the correct instructions. These instructions vary by bank, so only your bank will be able to guide you on the correct information that needs to be entered.
Download NACHA File for Bill Payment
Once you have entered your vendor’s banking information and configured ACH for your account, you are ready to generate your NACHA file through Accounts Payable. Go to Accounts Payable under the Transactions tab in the navigation menu, or click “Accounts Payable” on the configuration page.
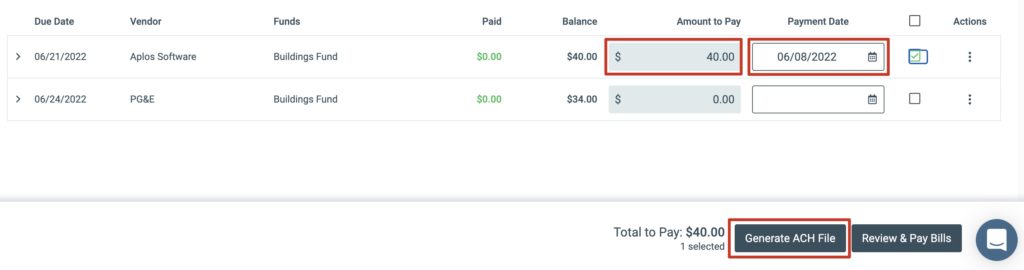
In the Bills to Pay section of the page, you’ll see any outstanding bills with any amount(s) that have been paid and the remaining balance. Select an asset account that is set up for ACH File Export under Cash Account. Enter the amount you’re paying and the date of the payment, and then select “Generate ACH File.” A NACHA file can only be created by users with role permissions of Administrator, Manager, Accounting Manager, or Accounts Payable Manager. Bills will remain in this section until paid in full.
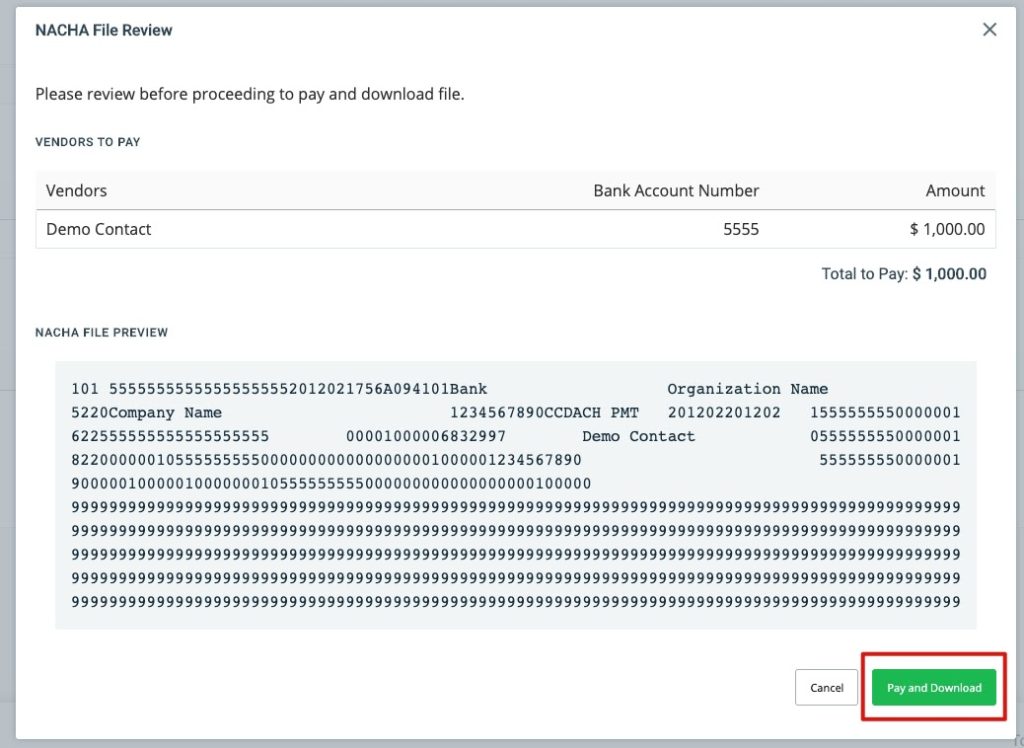
Next you will see the ACH File Generator. Choose the preferred settlement date. Your bank may have guidelines for how far into the future the settlement date must be. You can also review the vendors and the amounts you wish to pay.
Note: Vendors without banking information will not be included in the final NACHA file. However, the payment of the vendor will still be recorded in Aplos. If you do not wish to mark them as paid, exit the screen, and either add banking information for the vendor or remove them from the ACH payment batch.

Once the correct information has been verified, click “Pay and Download ACH.” This will provide a preview of your file. Click “Pay and Download” at the bottom of the previewed file to download a NACHA .txt file to your computer.
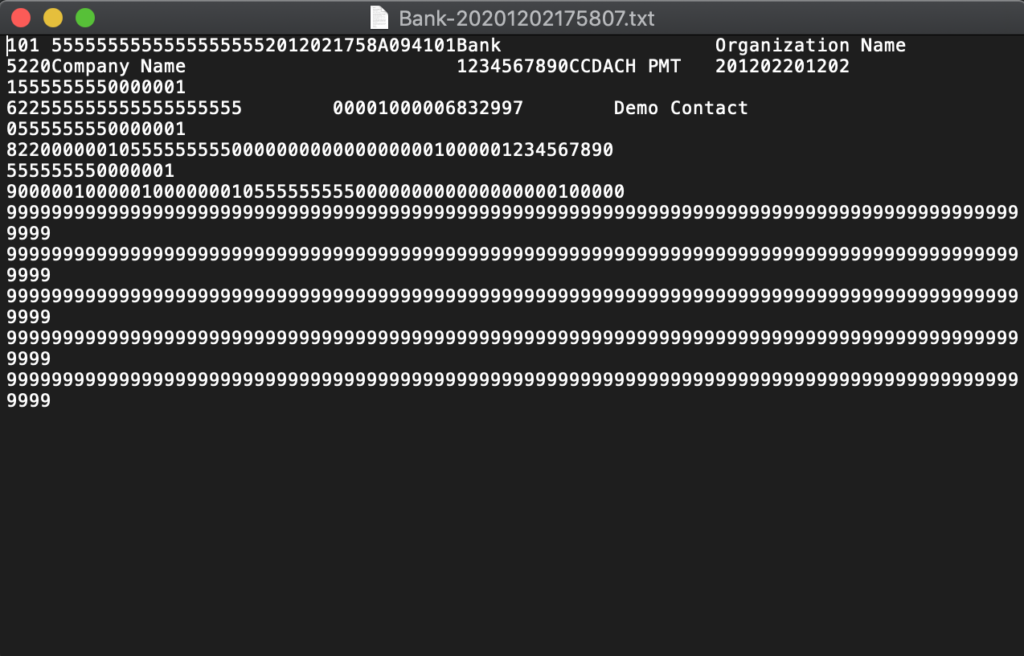
The .txt file name will include the name of your bank and the timestamp of when it was downloaded. Save your .txt file in a folder where you can ensure you can find it when you are ready to upload it to your bank.
Note: Once the NACHA file is downloaded, there is no option to regenerate the file. If this is lost or changed, you will need to delete the payment in Aplos and recreate the file.
Once the download is complete, click “Finished” to be redirected to the Accounts Payable screen.
Initiate Bank Transfers With NACHA File
When you are ready to initiate your bank transfer, locate your downloaded NACHA .txt file.
Import this NACHA file into the ACH payment service with your bank, and follow the instructions provided by your bank to initiate payments.
If you receive an error with your bank that you are unable to resolve and decide to not create the bank transfers, follow the instructions below to delete the payment in Aplos to ensure your bookkeeping stays accurate with your account.
Managing ACH Payments in Aplos
How to See Exported ACH Payments
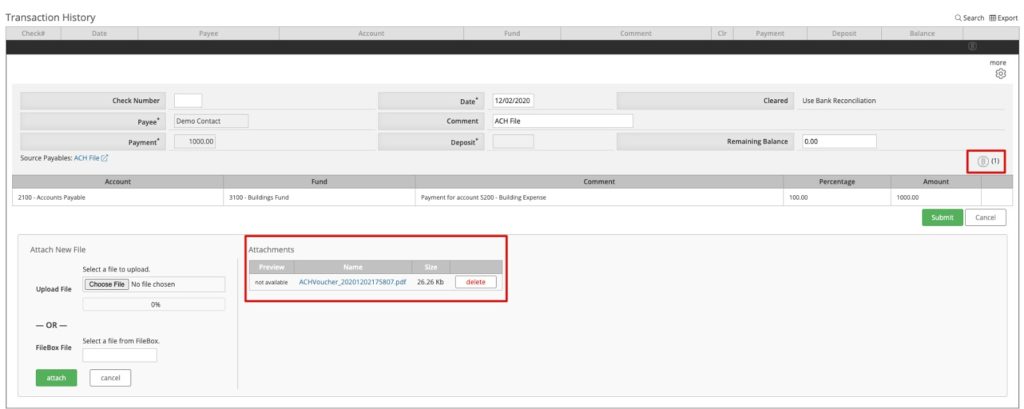
When the NACHA file is downloaded, the invoices selected will be recorded as paid for the amount noted in the ACH payment.
The transaction posted in the asset register for the payment will have a voucher attached with payment details. The payment voucher will also be posted in the Filebox as a PDF copy.
Delete or Edit an ACH Payment in Accounts Payable
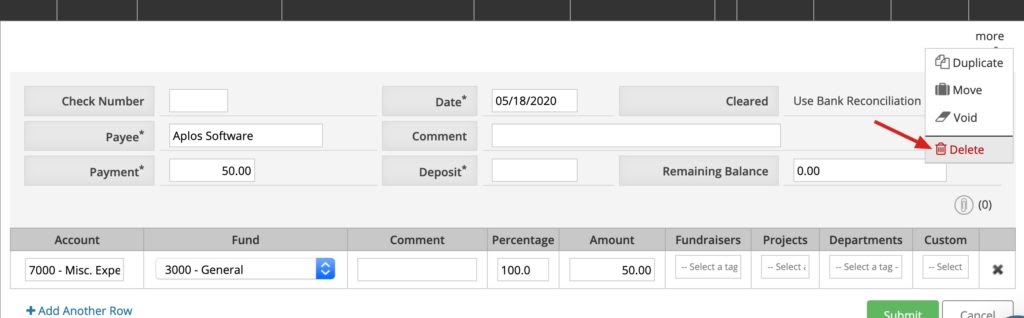
If you have recorded any ACH payments on a payable that you need to edit, you will need to delete the payable on the register screen under Transaction History. You can delete a transaction from the register by clicking on the trash can icon on the far right of the transaction.

You can also select the transaction, choose “More” on the upper right side of the screen, and click “Delete.”
Note: The payment voucher attached to the transaction will still be stored in the Filebox for your records.
When an Accounts Payable payment transaction is deleted, the payable will be moved back into the Pay Bills section in Accounts Payable. This will allow you to edit the payable or re-create the ACH payment. If you wish to learn more about Accounts Payable, see the Accounts Payable guide.
How to Disable ACH File Export
Administrators can disable this feature from the Subscription page by selecting “Change Subscription” and clicking on the trash can icon. Disabling ACH File Export will not change any settings in your bank account or the payments you have initiated with your bank. You will need to manage those directly with your bank.
If you have disabled ACH File Export, you will no longer be able to view or manage the ACH information for your contacts in Aplos, but you will be able to see vouchers for past ACH payments in the register.