You can enter income and expense transactions into your Account Register in several different ways.
- Manually enter each transaction in the form on the register.
- Import transactions using Bank Integration
- Import a list of transactions using the Manual Import tool.
Using a Manual Import tool is helpful way to bring in data from your bank account or an old system by cleaning up the data in a spreadsheet first and then import all at once. Most organizations will start by exporting the transactions they wish to import from their bank statement so you already have most of the data you need in a spreadsheet format.
Note: If your deposits include donations, you will want to input or import those as contributions using the Donations area if you plan to prepare contribution statements. If you import them directly into the register they will not be tracked by donor for giving statements. Resource: Contributions and Deposits
Below is a recorded tutorial to show the manual import process and a few tips and tricks on formatting to the Aplos Transactions template:
How to Import Transactions
Before getting started with importing transactions – make sure you have your needed income and expense accounts created in your chart of accounts.
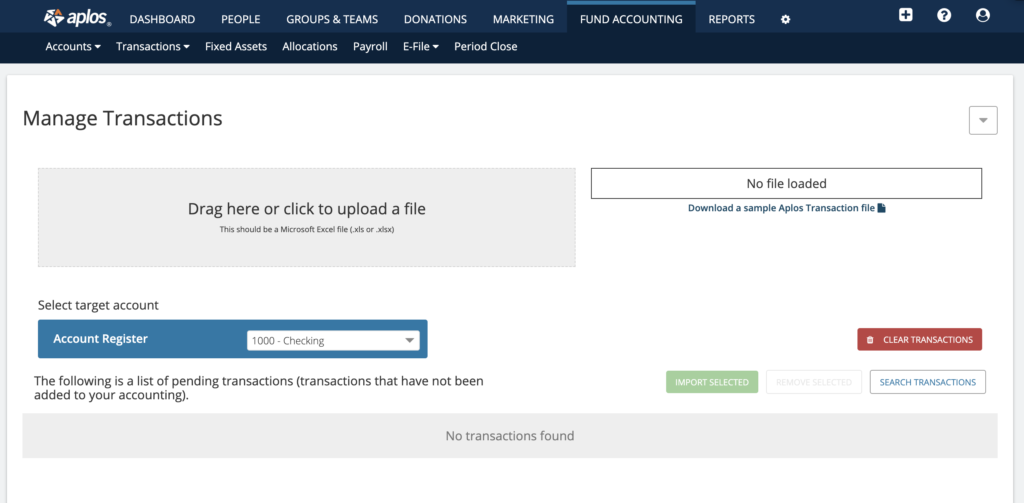
Step 1: Download the Import Template
Navigate to the “Registers” tab in Aplos. (Fund Accounting > Transactions > Registers) then click the Import” icon in the top right corner to go to the Manual Import page. Then click “Download the sample Aplos transaction file.” This excel spreadsheet will include a list of your available accounts and funds that are listed in your Aplos Chart of Accounts on separate tabs.
Step 2: Enter Transaction Data Into the Spreadsheet
You will need to format the transactions that you were able to download from your bank into the provided template.
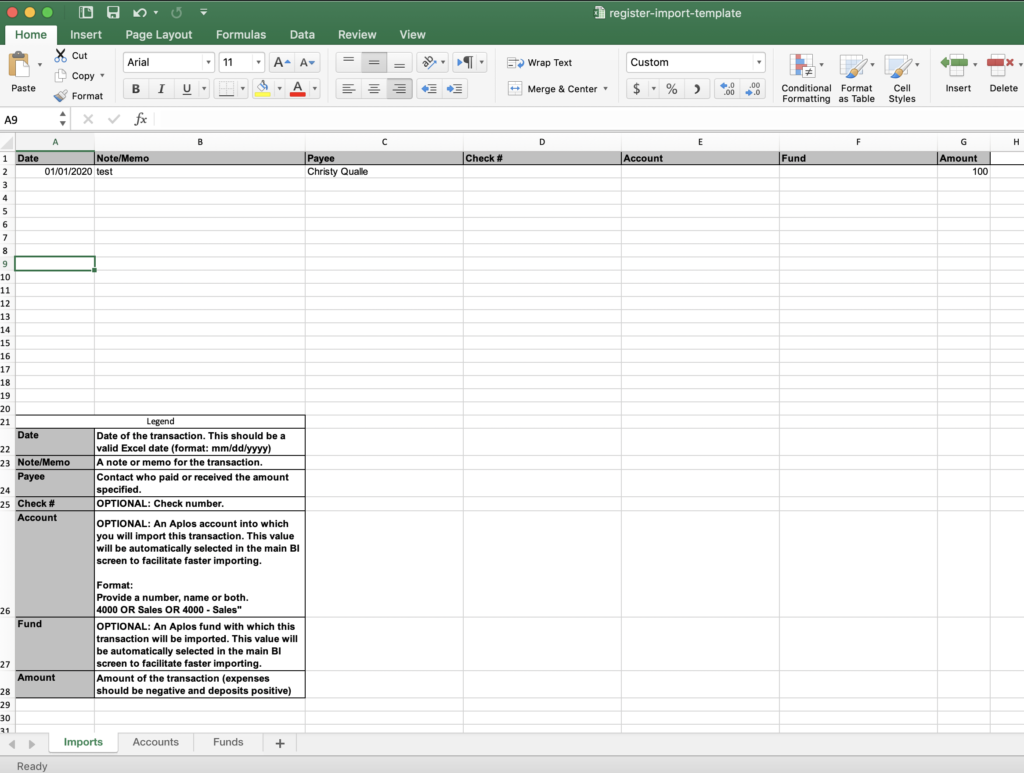
Columns Available to Import with Transactions
Date: Transaction date is a required field and may be formatted as MM/DD/YYYY (Ex. 01/01/2016)
Note/Memo: Optional text field for the note or memo for the transaction.
Payee: Payee is a required field for the contact who paid or received the amount specified. If the name does not exactly match a name in your database, a new contact record will be created.
Check #: This optional numeric field is to note the check number of a check sent by your organization. This field cannot contain symbols or letters.
Account: This optional field is for the Aplos account into which you will import this transaction. You can select from available accounts shown on the Accounts tab in the import template. If you do not select an account, this value will be automatically selected in the main BI screen to facilitate faster importing.
Format: The account can be account number (e.g. 5000), account name (e.g. Salaries Expense), or account number and name (e.g. 5000 – Salaries Expense).
Fund: This optional field is for the name of the Aplos fund with which this transaction will be imported. This value will be automatically selected in the main BI screen to facilitate faster importing if you do not complete it on the spreadsheet.
Amount: Amount is a required numeric field. Payments must have a negative sign in front of the amount (e.g. -100.00), and deposits must be a positive amount (e.g. 100.00).
Tags: If you have Tags enabled on your account for more granular tracking, you will also see a column for each tag dimension that you can assign to your transactions and a separate tab on the spreadsheet for the tags available in that tag dimension. If you have not enabled a Tag layer, this will not be visible. (Resource: How to Use Tags)
For example, if you have Location tags, you’ll title the column ‘Tags: Locations’. Please see the example below:

Note: Once you formatted your transactions, delete the legend in the import template.
Splitting a transaction in your Import
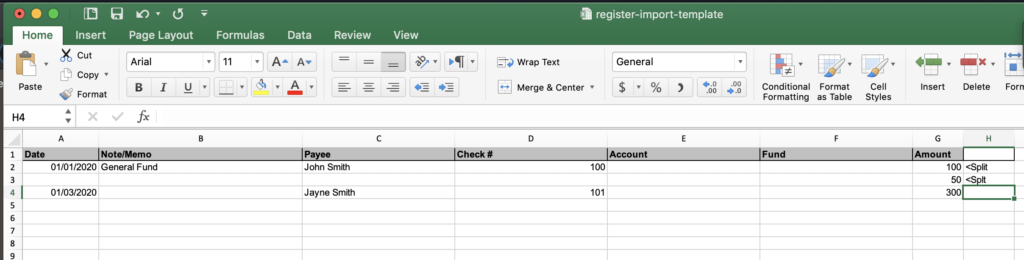
If you wish to split one of your transactions in your import, you will enter the date, note/memo, payee, and check number, and the amount of your first split on one row. Then on the next row, enter the amount, along with the account and fund for the split. If you wish to have multiple splits, you can add additional rows below noting the amounts. Do not include the date, note/memo, payee, or check number to your rows that note splits.
In the example shown below, there is one $150 payment from John Smith that has been split into two separate rows. When imported, we will be able to assign them separate accounts, funds, or tags or they can be noted here on the spreadsheet.
Step 3: Import Your Spreadsheet
Once your file is ready, save it to your Desktop, then you can either click the box on the left to upload it to the Manual Import page, or drag and drop it into the blue area to start your import.
Once the file is loaded, you will see a list of the transactions.
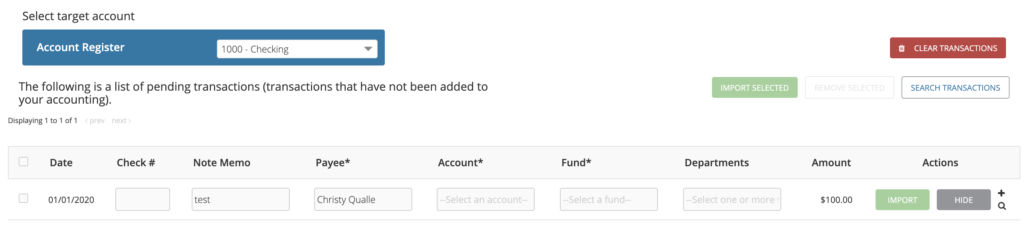
Before importing any transactions, confirm the account shown in the Account Register box is the correct account. You can change your account using the dropdown. Then, review your imported transactions, make any needed edits, and assign your account and fund for each transaction.
To complete your import, select “Import” for transactions one by one, or select all transactions at the top of the table and click Import All.
Other Related Resources:
If you need assistance with this process, feel free to reach out to our Support Team.