Donation Reporting
AplosPay Merchant Center
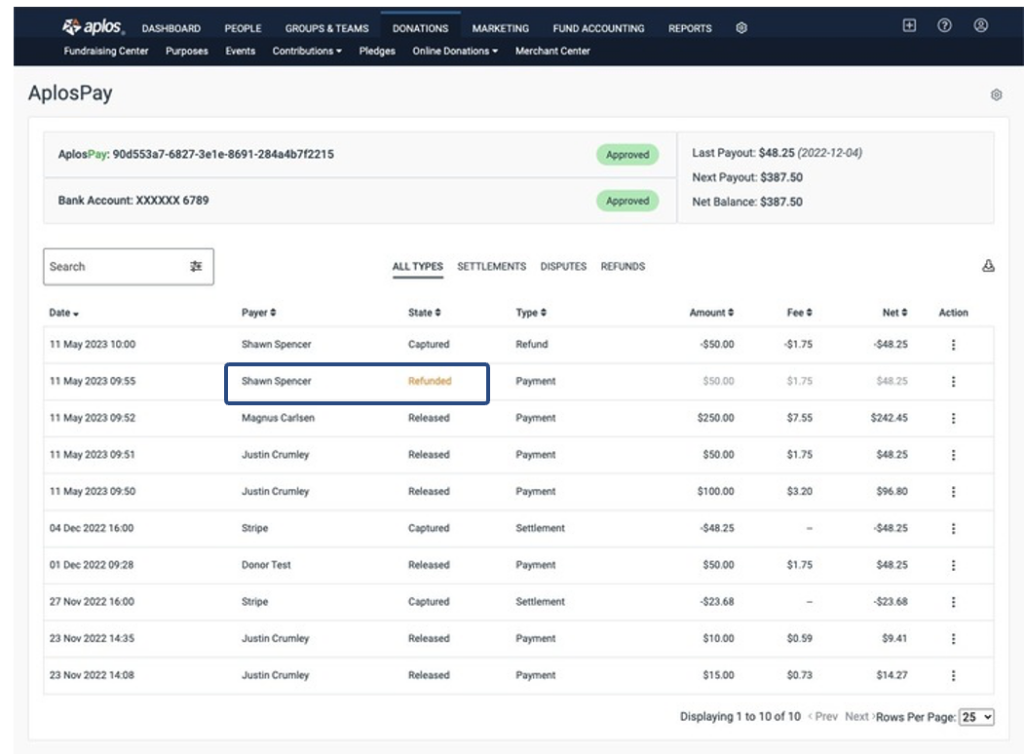
The AplosPay Merchant Center is a centralized dashboard for managing all secured processed payments. Click “Donations” in the navigation menu and select “Merchant Center.” From here, you can view all processed payments and their statuses. View your Last Payout, Your Next Payout, and the Net Balance of your merchant account.
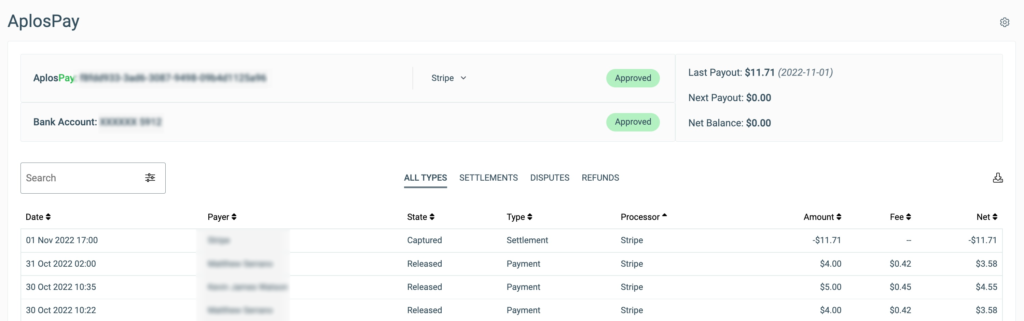
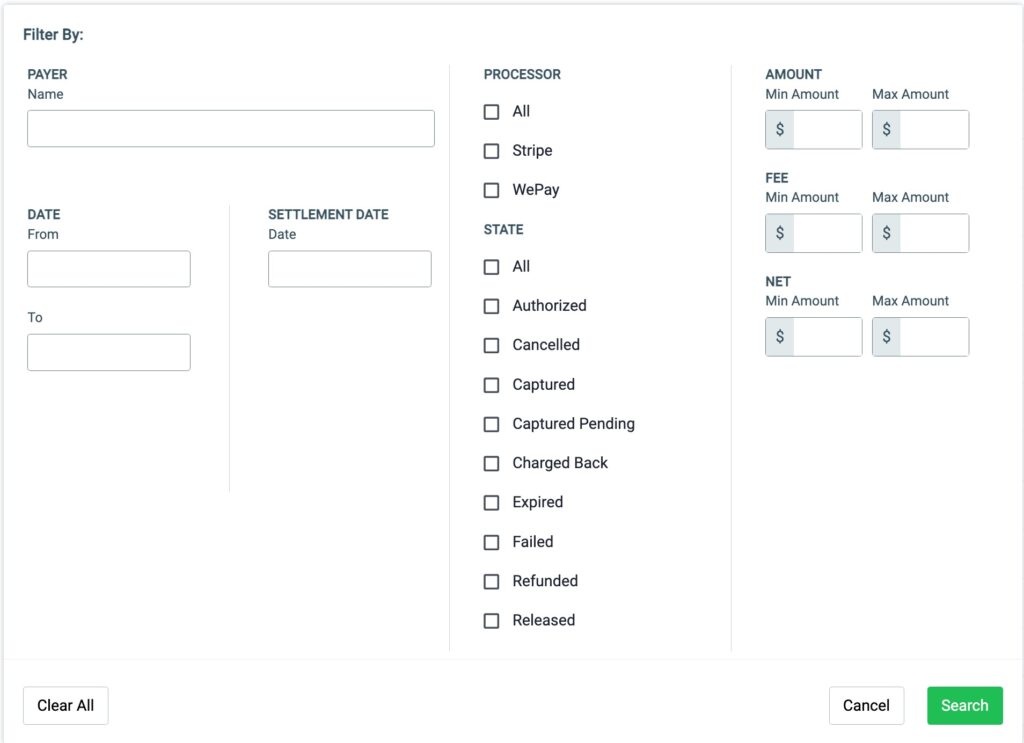
Search for specific payments based on your criteria by using the search function. You can also filter your payments by Type using the four tabs: All Types, Settlements, Disputes, and Refunds.
For more information on specific payments received, click on the payment to display the receipt of the transaction. This will display the Transaction ID along with related information about the payment received.

Any information presented on the dashboard can be exported. Click on the download icon on the right side of the screen and select “Export.” This will begin downloading an Excel file onto your device. For more information about what each AplosPay status means, view our resource on Online Donation Statuses.
Online Donations Screen
The Online Donations screen allows you to view the history of all payments that have occurred through one of the online giving avenues within Aplos. You can get here by navigating from the Donations tab to the Online Donations menu to Online Donations.

Initially, you will see the following columns available for reference:
- Donor: Name of the donor who submitted the donation
- Gross: The total amount the donor offered to give
- Fee: Payment processing fee that is deducted from each transaction
- Net Amount: The total amount the organization receives (Gross minus the Fee)
- Donor Paid Fee: The amount the donor opted to increase their gift to cover the processing fee
- Status: The processing state of the transaction (see Online Donation Statuses for additional details)
- Purpose: The designation of the gift for a specific purpose (see the Purposes Guide for details)
- Source: The giving area this gift came from (i.e. General Form, Building Widget, Text to Give)
- Date: When the donation attempt was received
- Donation Note: Any additional details the donor provided in the Notes area of your Online Donation Form or Widget
You may also utilize the buttons at the top of this page to perform a filtered search by certain details, or you can export the full history of online donations to Excel.
Contributions and Deposits Screens
Aplos automatically records your online donations in the Donations area of the software. However, if you need to review or edit these entries, you can do so by going to either the Contributions or Deposits pages under the Donations tab and clicking on the entry. Pro Tip: These will show with a Deposit name in the following format: Online Donation: [Date].
Once the appropriate revisions have been made, click “Save” to finalize these changes.

Online Donation Transactions in Accounting
When setting up your ability to receive online donations, one crucial step you’ll need to do is configure the appropriate accounts to track payment processing fees and AplosPay withdrawals in the system.
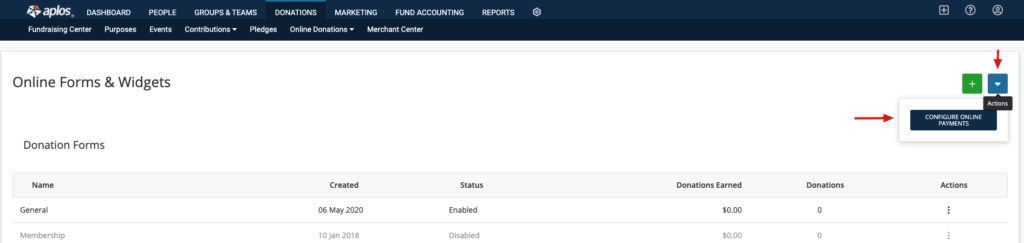
To accomplish this, you will need to go to the Online Donation Forms screen. On the top right, click the Actions icon and select “Configure Online Payments.”
This will take you to a screen where you will select an appropriate Expense Account and Cash/Bank Account (from your Account List) to track this information.
If this area is not set up, the online donations that come through will not be tracked on the Accounting side of the software.
Donation Notifications
Administrators now have the option to enable or disable notifications related to payment processing. All notifications default to disabled.
How to Enable and Disable Notifications
From the Merchant Center, click the gear icon and select “Manage AplosPay Notifications.”
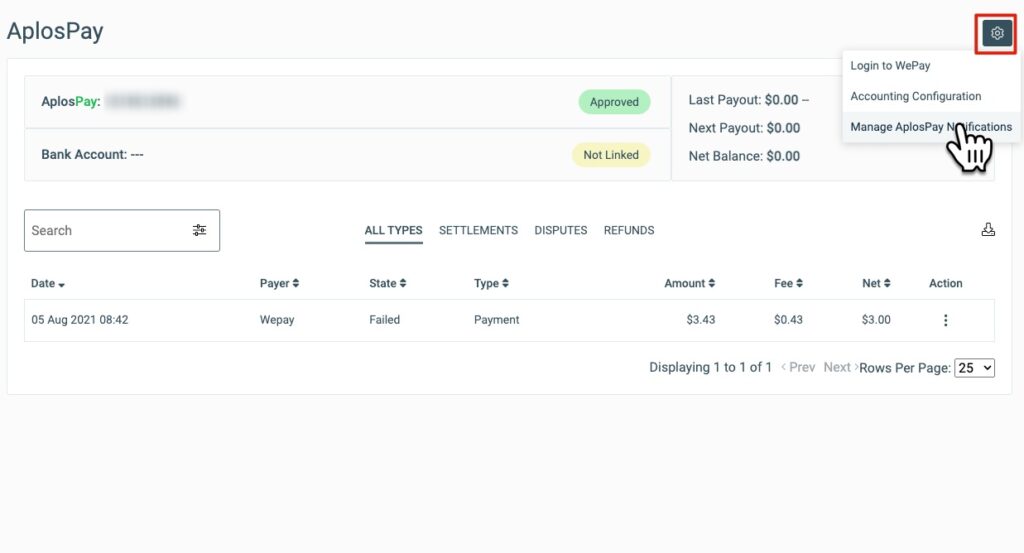
You can enable notifications for donations, Accounts Receivable payments, refunds, failed refunds, and received settlements.
Administrators on accounts can set up their own notifications from My Profile.
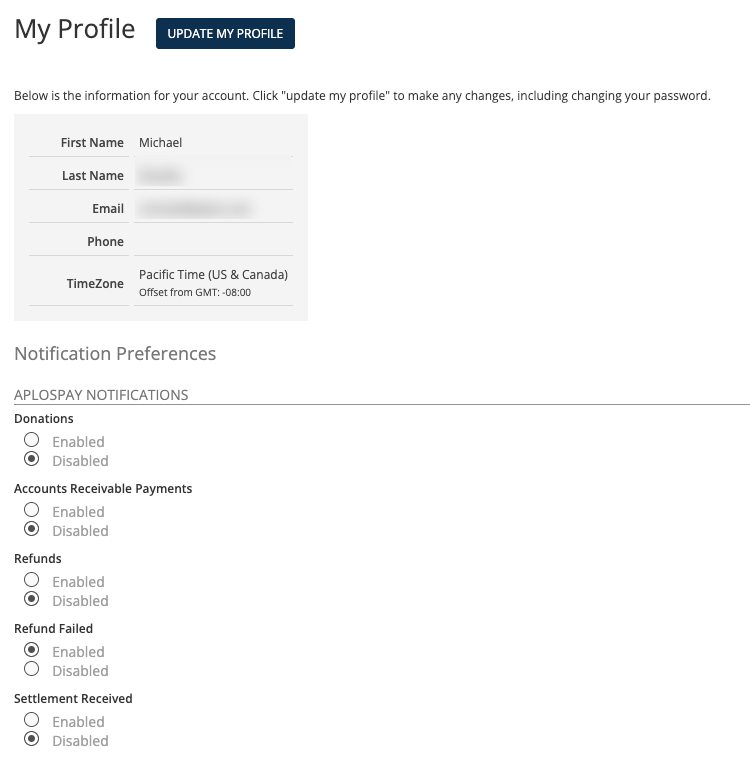
Oversight administrators can set their notification settings by organization. When auditing a subsidiary organization, oversight administrators will need to manage notifications from My Profile. These selections will be specific to the subsidiary.
This is an autosave function. Once a change is made, it is safe to navigate back to the Merchant Center.
Donation Reports
Since your online donations are automatically recorded in the software, this information will also be readily available on the donation reports in the software, including Contribution Statements, which can be generated from the Donations by Contact report.
Managing Your Donors
Donation Activity: The Feed
Another way to keep track of your online donations is by reviewing The Feed.
The Feed allows you to see alerts for the following donation details:
- Recurring Donation Changes: When a donor increases, decreases, or cancels the value of their recurring donation
- Donation Failures: When a donor tries to give to your organization using your online donation form but experiences a problem
- First-Time Donors: When you add a new donor to your database through an online donation or Contribution Management
- Recurring Donation Successes: When you receive a recurring donation
All alerts can be turned on or off, at any time, from the Settings area within The Feed.

Recurring Donations Screen
The Recurring Donations screen allows you to view and manage all recurring donations that have been set up through one of the online giving avenues within Aplos. You can get here by navigating from Donations to Online Donations to Recurring Donations.
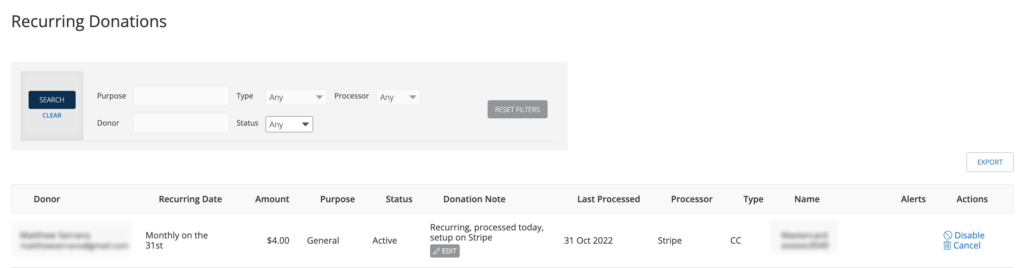
Along with viewing essentials like Name, Amount, and Purpose, this page will also show you other vital details, such as:
- Recurring Date: The selected date for the donation to run (i.e. monthly on the first, weekly on Sunday)
- Status: Shows if the recurring donation is active or inactive
- Last Processed: When this gift last processed successfully
- Type: Payment Method (i.e. credit card or ACH/bank)
- Name: Additional details if using a credit card (i.e. Visa xxxx1234)
- Processor: The donation processor
- Alerts: If a donation needs attention due to a processing failure (i.e. processing_error: Unable to charge payment method: general decline)
- Actions: Offers options to temporarily enable or disable a donor’s recurring donation as well as permanently cancel or remove the recurring donation from the system
Along with viewing this information, you are also able to perform a filtered search and/or export these details into Excel.
Common Questions
How can I see what payment method is used?
For one-time donations, there isn’t a way to see what payment method was used. The best option would be to identify how much the fee is (which can be found on the Online Donations screen) and compare it to the Gross amount.
However, if you are looking for a recurring donation, this can be found on the Recurring Donations page.
Can I set a donation to include a non-deductible amount?
The Online Giving tools available in the system are designed to only keep track of tax-deductible amounts. If you are looking for a way to track online payments that are non-deductible (NTD), the best way to handle this would be to create an event in the Events module.
By creating tickets for NTD items, such as meals, clothing, etc., you can enter a Fair Market Value amount, which will properly record that portion of the payment as NTD.
For more information regarding Aplos’ Events module, please see the following guide: Create an Event and Sell Tickets Online Using Aplos Event Registration.
How to Help Your Donors
How to Stop a Recurring Donation
If your donor wishes to discontinue their recurring donation, you can assist them with this by going to the Recurring Donations area and utilizing the Disable or Cancel options. (See the Recurring Donations section in this article for clarification of both options.)
How to Change the Amount or Schedule of a Recurring Donation
This information can be updated by the donor by logging into their Donor Profile. The following guide goes over setting up this profile if the donor has not done so yet: How to Change Your Recurring Donation.
If the donor runs into any issues, they are welcome to contact our Support Team for further assistance.
How to Help a Donor Update Their Payment Method
For security purposes, payment method information can only be updated by the donor. They can accomplish this by logging into their Donor Profile. The following guide goes over setting up this profile if the donor has not done so yet: How to Change Your Recurring Donation.
For security and liability reasons, the Aplos Team cannot accept any payment information over the phone or by email.
For further information, donors are welcome to contact the Aplos Support Team regarding any technical issues they encounter during this process.
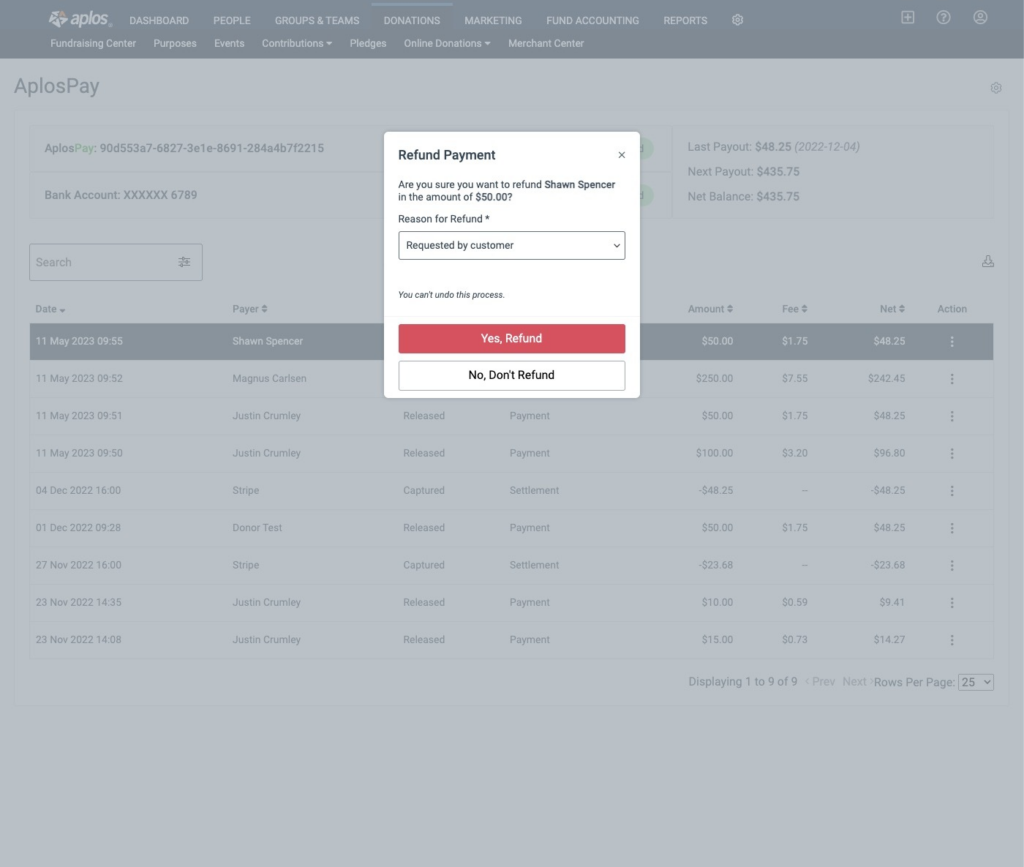
How to Refund a Donation
Within the Merchant Center, administrators can initiate a refund of a Stripe payment when the transaction is eligible for a refund. A customer sees the refund as a credit approximately 5-10 business days later, depending upon the bank.
When a payment processed with Stripe is refunded, we send emails to the organization administrator(s) and the payee.
Refund Transaction Statuses
- (NEW) – A refund request has been sent to Stripe.
- CAPTURED – A refund has been processed with Stripe.
- FAILED – The refund did not succeed or was returned. This can happen if the account was closed. This requires manual updating in your accounting.
Some refunds—those issued shortly after the original charge—appear in the form of a reversal instead of a refund. In the case of a reversal, the original charge drops off the customer’s statement, and a separate credit isn’t issued.
From the Merchant Center, administrators can refund a payment by selecting the kabob menu (three dots) and clicking on “Refund Payment.”
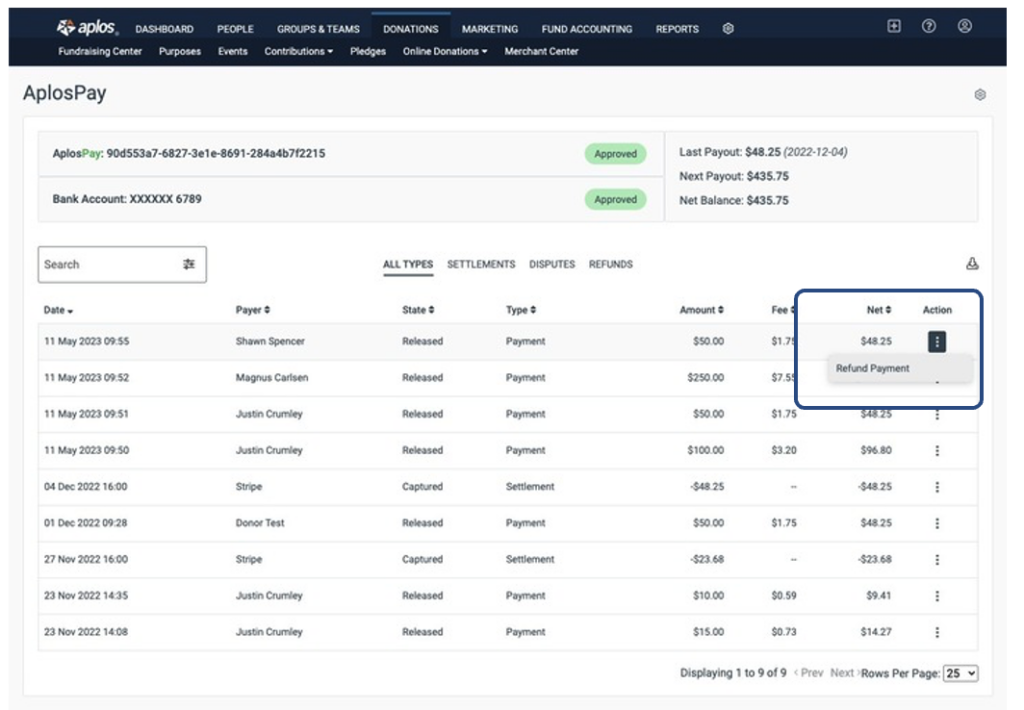
Then select a Refund reason (Duplicate, Requested by customer, or Other).
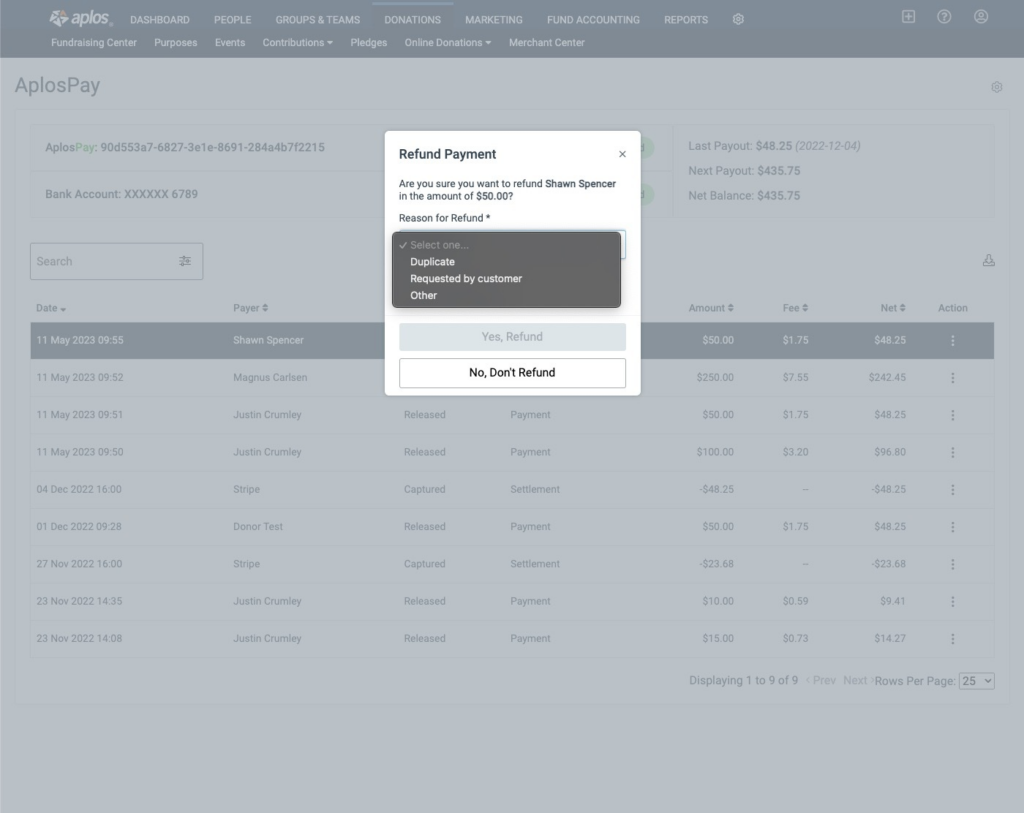
Confirm the refund submission by clicking “Yes, Refund.” Or click “No, Don’t Refund” to cancel the refund submission.
Note: This action is final. Refunds cannot be reversed.
Once a payment has been refunded, the state of the payment will be displayed as Refunded in the Merchant Center.