With Aplos, you have the ability to link contacts to assign them to a household. Once assigned, you can generate a contribution statement for your household, view all transactions or donations for a household, and generate smart lists by household. Below are the steps to get started.
Creating A Household
You can create a household in just a few easy steps. From your navigation menu, click “People,” and then click “Households.”
Now in your Households List, you can add a new household, or view, edit, or delete an existing household. To create a new household, click the green plus (+) icon in the top right corner.
- Name – This will be how you refer to households. For example, you might name the household “The Doe Family.” This name will appear on their household contribution statement.
- Salutation – This will be how you’d like to address the household when emailing household statements. This can be edited to your preference. In the case of the Doe Family example, it may be Mr. & Mrs. Doe.
- Sort Name – This will determine the order you want to view the household on the Household List. A good practice would be using their last name as the Sort Name. Using this method, your list will automatically be sorted by last name.
Adding An Image To A Household
You can add a photo of the family to each household. To do this, click “Add an Image.” Click “Select Another” if you have not already uploaded an image. Add an image that you have previously saved in your Filebox, or upload a new image.
Select the image you’d like to use, and then click “Apply.” This will confirm your selected image. Click “Apply” again to return to the household.
You can also upload a new image from your computer. Click “Upload” and then choose your image from your files. This will automatically start the upload process.

Once the image has uploaded, you can view it under the Selected Image section. Then click “Apply.”
This will allow you to preview the image before saving it to the household. Click “Apply” to add the image to the household. This will bring you back to editing the household, where you’ll notice the image is now saved to the household.

Now that you’ve added an image to the household, you’ll notice it is displayed on the top left tile of the household details.
If you ever need to remove the image, you can click on “Edit this Image” and then click “No image is selected.” Lastly, click “Apply.”

Adding Members To A Household
You can add members to your household from the Members section. This will allow you to add an existing contact from your Contact List. If the contact does not already exist, you will need to add it before linking the member to the household. To add a member to the household, search for their name in the “Add a Member” field.
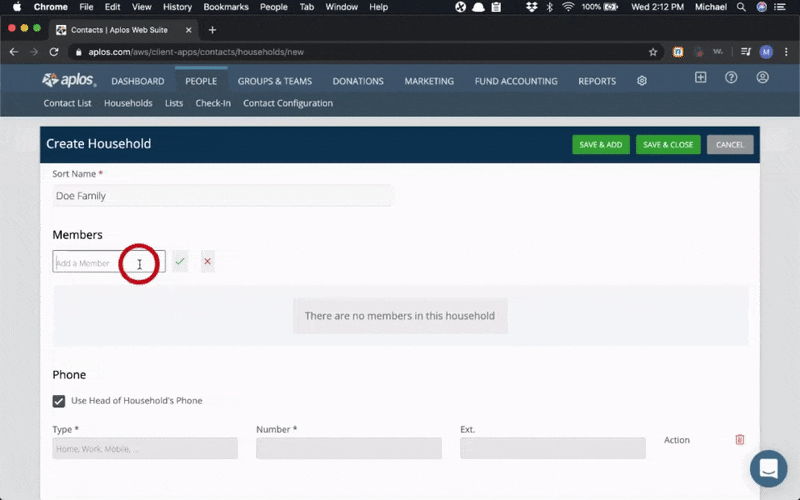
As you type in the contact’s name, you’ll notice suggested contacts from your Contact List. Click on the contact you’d like to add as a member of that household, and then click the green checkmark icon. If you’ve accidentally selected the wrong contact, click the red x icon.
Once you click the green checkmark icon, you’ve successfully added that contact to the household. Keep in mind that a contact is limited to one household.
After selecting the member, you can provide them with a Member Role. The Head of Household role is given to the primary contact. This role will set the household’s primary contact information.
You have the ability to choose different roles and how they are related to the head of household. You can also create new relationship types on the Contact Configuration page under the People tab.
Editing Members Of A Household And Head Of Household
Once you’ve added members to a household, you can complete actions such as assigning a member as the head of household or deleting a member from that household.
Setting a member as the head of household will be reflected in the Status column. You can always remove them as head of household from the Actions column.

Household Actions
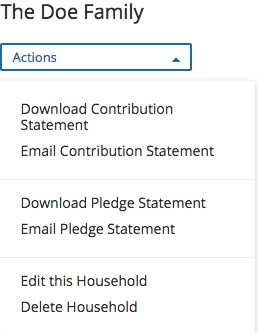
Within each household you will have the ability to accomplish actions like downloading or emailing contribution statements, pledge statements, and editing or deleting the household. To access the menu seen below, click “Actions” on the top left tile of the household.
Edit Household Details
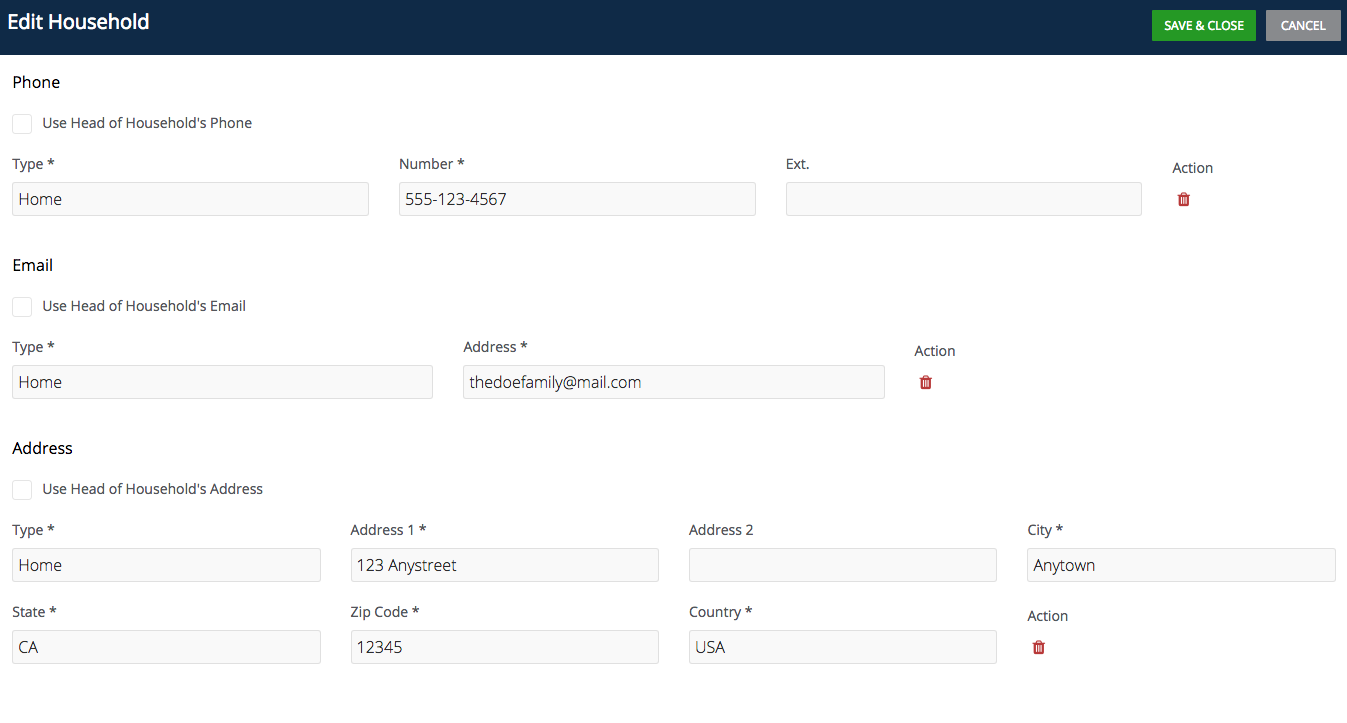
You have the ability to set the primary household contact information or default to any contact information saved to the head of household. The default is to use the head of household contact information, but you can change that to use different contact information specific to the household. To enter contact information specific to the household, you will first need to uncheck the boxes that use the head of household’s information. Then enter the contact information for the household and click “Save & Close.”
Deleting A Household
If you need to delete a household, go to your Household List and locate the household you wish to delete. Select the red trash can icon on the right-hand side. This will prompt you to confirm your deletion of the household. This action will only delete the household. Your contacts will still be intact, along with their contact information and any activity associated with the contact.

Household Contribution Statements And Pledge Statements
You can choose to print or email statements. To print, click “Download Contribution Statement,” or “Download Pledge Statement.” This will provide a PDF of that household’s contributions or pledges, respectively. All contributions credited to members of the household will appear on the contribution statement. You will have options to customize the statements before you download them. Select your display options (detailed or summary), date range, categorization, include a personalized message, and choose if you’d like to display your logo. Click “Download,” and a PDF of the statement will be saved to your computer.

To email a statement, click “Email Contribution Statement” or “Email Pledge Statement.” You have the ability to change a few options, such as the sender’s email address, reply-to email address, email subject, text, and custom fields. Do not remove the “Link” option because this is the unique URL for that household to access their contributions from their Donor Profile.
An email will be sent to each member of the household that has donated. All members will need to have an email address saved to their individual contact profile. This will allow the member to access their donor profile known as My Aplos for individual contribution statements. For more information about My Aplos, check out our My Aplos Guide.

View Household Activity
Within a household you will have different types of information about the household. Check out the tab descriptions for the household profile below.
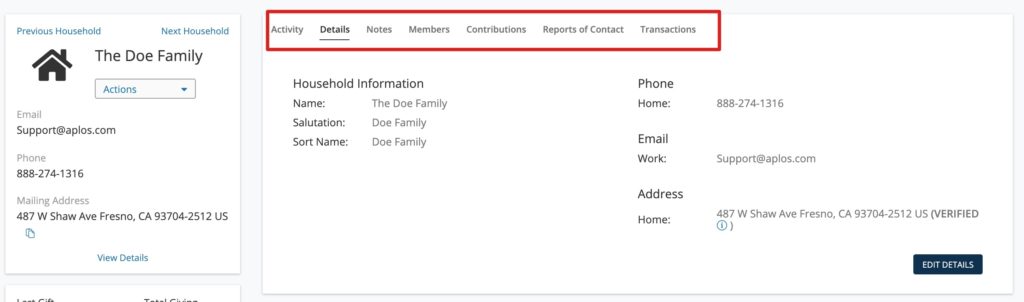
- Activity – This contains all activity related to the household.
- Details – These details contain the primary contact information for the household.
- Notes – Keep detailed notes about the household, any note for a household will also display on the contact notes tab for all members of the households.
- Contributions – These are all the donations received from any member of the household.
- Reports of Contact – These contain any forms of communication related to the household.
- Transactions – These include transactions that are not related to contributions from any member of the household.
You’ll notice the bottom left tile shows donation history. You can click the “Donation History” link to view donations in detail.
Now that you’ve created households, you can generate a Donations by Household report.
Exporting Households
On your Household page, you have the ability to export a list of households, along with their contact information. To do this, start by navigating to your Household List. On the right-hand side, locate and click “Export Households.” An Excel file of your households with the following fields will begin to download to your computer:
- Household ID
- Name
- Sort Name
- Salutation
- Head of Household
- Members
- Phone
- Street 1
- Street 2
- City
- State/Region
- Country
- Postal Code

Using Households In List Designer
List designer is a tool in Aplos that gives you the power to create customizable lists based on your criteria. Within List Designer you can use several household filters to assist with your list creation. Examples of different filters you can utilize include:
- In a Household
- Not in a Household
- Household
For more information on how to leverage List Designer, check out our List Designer resource.
Using Households In Letters
The Letters tool in Aplos helps you communicate with your contacts via physical letters. Within your Letter Builder, you can produce and mail letters to households in your contact lists. It includes a mail merge feature, which allows you to customize parts of the letter, such as the household’s salutation, while keeping the rest of the letter uniform.
For more information on how to build letters, check out our resource on letters.